
Want to add a personal touch to your holiday décor without spending a fortune?
Christmas ornament DIY projects are one of the easiest ways to make your tree feel special.
Handmade ornaments add more meaning to your celebrations, help you save money, and turn decorating into a fun family activity rather than another chore.
In this guide, you’ll find simple, beautiful ornament ideas split into clear categories. Each one takes just 3 steps, making them perfect for beginners, kids, or anyone who wants stress-free holiday crafting.
Let’s get started and make this your most creative Christmas yet!
What You Need to Make DIY Christmas Ornaments
Before you start making ornaments, it helps to know what you already have at home. Most DIY Christmas ornament projects use simple supplies you can find in any craft store or even your kitchen.
| Tools | Materials |
|---|---|
| Scissors | Paper or cardstock |
| Hot glue gun | Ribbon, twine, or string |
| Paintbrushes | Acrylic paint or markers |
| Hole punch | Clear fillable baubles |
| Wire cutters | Beads, buttons, or bells |
| Needle and thread | Felt, fabric, or yarn |
| Craft knife | Pinecones, twigs, or dried oranges |
| Mixing bowl | Air-dry clay or salt dough |
You don’t need everything on this list for every project. These are just the basics that cover most ornament ideas. Start with what you have. Then add a few extras as you try new styles.
Pro Tip: Keep all your supplies in one box or basket. It speeds up cleanup and keeps your crafting space organized between projects.
Classic Christmas Ornaments DIY

These timeless favorites bring cozy, traditional charm to your holiday décor. Classic Christmas ornaments DIY projects never go out of style and work with any tree theme.
1. Salt Dough Ornaments DIY
Salt dough ornaments are perfect for beginners and kids. They cost almost nothing to make and last for years when stored properly.
Steps:
- Mix 2 cups of flour, 1 cup of salt, and 1 cup of water into a smooth dough
- Roll flat, cut shapes with cookie cutters, and poke holes for string
- Bake at 250°F for 2-3 hours, then paint and seal
2. Painted Wooden Slice Ornaments DIY
Wood slice ornaments add a natural, rustic touch to your tree. You can paint anything from snowflakes to family names.
Steps:
- Drill a small hole near the top edge of the wood slice
- Paint your design using acrylic paint or markers
- Thread ribbon through the hole and tie a loop
3. Clear Fillable Bauble DIY
Clear ornaments let you create custom looks with whatever you have at home. Fill them with glitter, fake snow, or tiny pinecones.
Steps:
- Twist open the top of the clear bauble
- Add your chosen filler like glitter, beads, or mini décor
- Close the top securely and add a ribbon hanger
4. Cinnamon Stick Bundle Ornament DIY
These smell wonderful and look charming on any tree. Cinnamon stick ornaments bring warmth and a holiday scent to your home.
Steps:
- Bundle 3-5 cinnamon sticks together with hot glue
- Wrap twine around the middle and tie a bow
- Tuck in small greenery sprigs and add a string loop
5. Paper Snowflake Ornament DIY
Paper snowflakes are a childhood classic that still works beautifully. Each one turns out unique based on how you cut it.
Steps:
- Fold paper into quarters or eighths
- Cut small shapes along the edges and unfold
- Punch a hole at the top and thread with a string
6. Button Christmas Tree Ornament DIY
Use extra buttons from your sewing kit to make cute mini trees. Stack them by size for a 3D effect.
Steps:
- Thread the wire through the green buttons from largest to smallest
- Twist the wire at the bottom to secure the stack
- Shape into a tree and add a loop hanger at the top
7. Glitter-Dipped Ornament DIY
Add sparkle to plain ornaments in just a few minutes. Glitter-dipped ornaments catch the light beautifully on your tree.
Steps:
- Brush glue onto the bottom half of a plain ornament
- Roll the glued section in glitter until fully covered
- Let dry completely, and add a ribbon hanger
8. Ribbon Bauble Ornament DIY
This no-paint option is perfect for using up leftover ribbon. Layer different colors and patterns for a textured look.
Steps:
- Cut ribbon into small loops and glue ends together
- Attach loops all over a foam or styrofoam ball
- Add a ribbon hanger at the top
9. Clothespin Star Ornament DIY
Wooden clothespins turn into a festive star shape. Paint them any color to match your tree.
Steps:
- Glue 5 clothespins in a circle with tips pointing out
- Paint the star and let it dry fully
- Attach twine to one point and hang
10. Jingle Bell Cluster Ornament DIY
The sound of jingle bells instantly feels like Christmas. Cluster them together for a fuller ornament.
Steps:
- Thread 5-7 small jingle bells onto a thin wire
- Twist the wire tightly at the top to hold them together
- Add a ribbon loop for hanging
11. Beaded Snowflake Ornament DIY
Beaded snowflakes look intricate but are simple to make. Use clear or white beads for an icy effect.
Steps:
- Slide beads onto thin wire in a snowflake pattern
- Twist the wire to secure each arm of the snowflake
- Add a string loop at the top
12. Stamped Clay Ornament DIY
Air-dry clay takes any stamp design beautifully. Press letters, patterns, or holiday images into the surface.
Steps:
- Roll out air-dry clay to about ¼ inch thick
- Press rubber stamps firmly into the clay and cut shapes
- Poke a hole, let it dry overnight, and add a string
Nature-Inspired Christmas Ornaments DIY
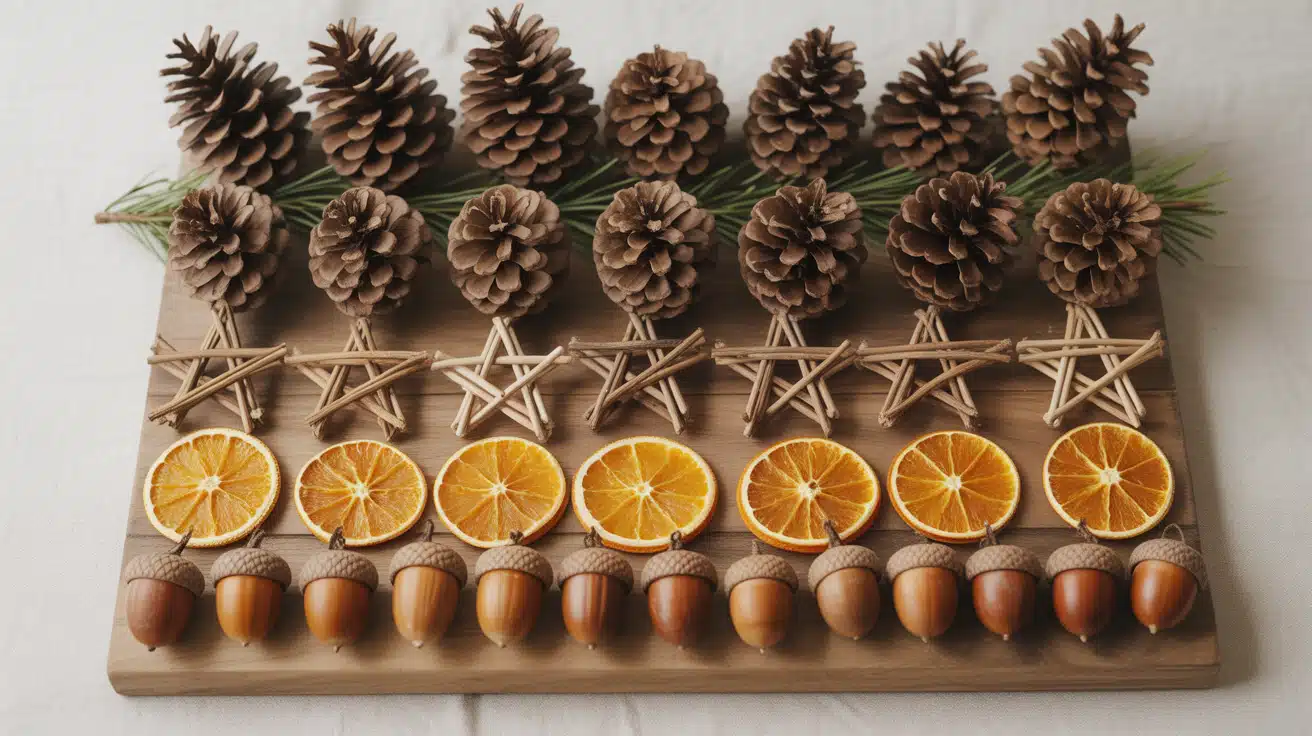
Bring the outdoors inside with rustic textures and earthy materials. Nature-inspired Christmas ornaments DIY projects use items you can gather from your yard or a quick walk outside.
13. Pinecone Ornament DIY
Pinecones are free, easy to find, and already shaped perfectly for hanging. Add a little sparkle and they’re ready for your tree.
Steps:
- Brush glue lightly on the tips of pinecone scales
- Sprinkle with glitter and let dry
- Tie the ribbon around the base and hang
14. Twig Star Ornament DIY
Collect small twigs to make a simple five-point star. This one works great for farmhouse or rustic tree styles.
Steps:
- Arrange 5 twigs into a star shape on a flat surface
- Hot glue the corners where twigs overlap
- Tie the twine at one point for hanging
15. Dried Orange Slice Ornament DIY
Dried oranges smell wonderful and look beautiful. They add a natural pop of color to your tree.
Steps:
- Slice oranges into thin rounds, about ¼ inch thick
- Bake at 200°F for 2-3 hours until fully dried
- Thread twine through the top and tie a loop
16. Acorn Cap Ornament DIY
Acorns are small but mighty for ornament making. Paint them metallic for a modern twist.
Steps:
- Paint acorns with gold, silver, or white acrylic paint
- Glue the caps back on securely
- Add a small string loop to the top with hot glue
17. Mini Wreath Ornament DIY
Tiny wreaths are charming on a tree or as gift toppers. Use real or faux greenery, depending on what you have.
Steps:
- Wrap thin wire into a small circle, about 2-3 inches wide
- Wind greenery sprigs around the wire base
- Tie the twine at the top and hang
18. Star Anise Ornament DIY
Star anise has a natural star shape and smells like spiced cider. Cluster a few together for more visual impact.
Steps:
- Hot glue 3-5 star anise pieces into a small cluster
- Add a ribbon loop to the back with glue
- Hang on the tree or use as a gift tag
19. Leaf Imprint Clay Ornament DIY
Press real leaves into clay to capture their texture. This works especially well with ferns or maple leaves.
Steps:
- Roll air-dry clay flat and press a leaf firmly into the surface
- Cut around the leaf or into a circular shape
- Remove the leaf, poke a hole, and let it dry before hanging
20. Moss Ball Ornament DIY
Moss adds softness and an earthy vibe to your tree. Pair it with twine or burlap ribbon for a cohesive look.
Steps:
- Roll preserved moss around a small styrofoam ball
- Secure with hot glue as you wrap
- Add a twine loop at the top
21. Natural Wood Bead Garland Ornament DIY
Wood beads look clean and modern. String them in a circle for a minimalist ornament style.
Steps:
- Thread natural wood beads onto twine or string
- Tie the ends together to form a circle
- Add a loop at the top for hanging
22. Bird Nest Ornament DIY
Tiny nests are sweet and symbolic. Add faux eggs or leave them empty for a simple look.
Steps:
- Shape small twigs into a nest using hot glue
- Tuck faux eggs or moss inside if desired
- Attach a thin wire hook to the side
Kids-Friendly Christmas Ornaments DIY
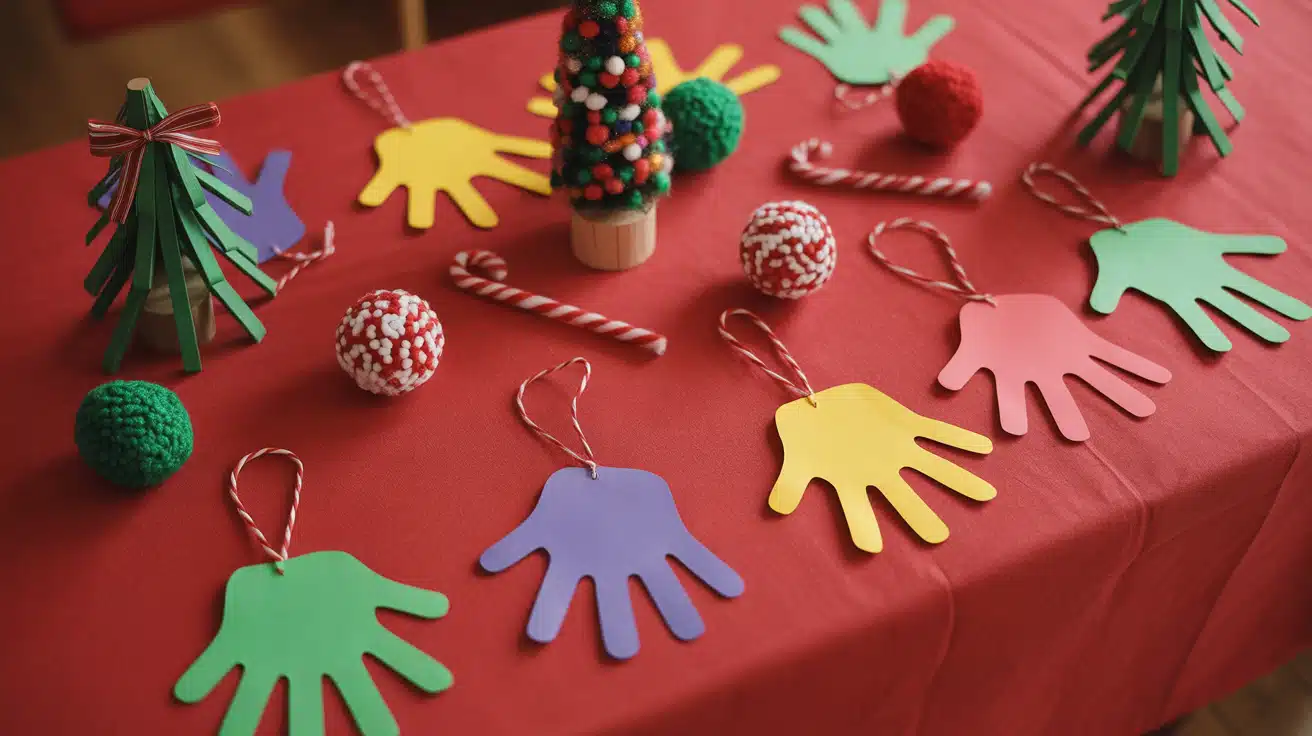
These ornaments are safe, colorful, and perfect for school crafts or family nights. Kid-friendly Christmas ornaments DIY projects keep little hands busy and create memories that last.
23. Popsicle Stick Christmas Tree DIY
Popsicle stick trees are easy for young kids to make. Let them pick their own colors and decorations.
Steps:
- Glue 3 popsicle sticks into a triangle tree shape
- Add pom-poms, sequins, or stickers as ornaments
- Attach a string at the top with glue or tape
24. Handprint Salt Dough Ornament DIY
Capture your child’s handprint to treasure for years to come. These make wonderful keepsakes and gifts for grandparents.
Steps:
- Press your child’s hand into rolled salt dough
- Cut around the handprint and poke a hole at the top
- Bake, paint, and add the year with a marker
25. Pom-Pom Bauble DIY
Kids love filling clear ornaments with colorful pom-poms. It’s mess-free and looks cheerful on the tree.
Steps:
- Open a clear fillable ornament at the top
- Let kids drop in colorful pom-poms until full
- Close the top and hang with ribbon
26. Paper Plate Ornament DIY
Paper plates are inexpensive and easy to cut. Kids can paint, color, or glue decorations onto them.
Steps:
- Cut a paper plate into a circle, star, or tree shape
- Let kids decorate with markers, paint, or stickers
- Punch a hole and thread with a string
27. Fingerprint Light Bulb Ornament DIY
Fingerprint art turns into a string of lights on the ornament. Use washable paint for easy cleanup.
Steps:
- Dip fingers into red, green, yellow, or blue paint
- Press fingerprints in a curved line on cardstock or a wood slice
- Add string details with a marker and hang
28. Foam Sticker Ornament DIY
Foam stickers stick easily and come in holiday shapes. This is a great option for toddlers and preschoolers.
Steps:
- Let kids press foam stickers onto cardstock or cardboard
- Cut around the design or into a shape like a circle or star
- Punch a hole and add a string
29. Pipe Cleaner Candy Cane Ornament DIY
Pipe cleaners bend easily and need no glue. Kids can twist their own candy canes in minutes.
Steps:
- Twist a red and white pipe cleaner together tightly
- Curve the top into a candy cane hook shape
- Hang directly on the tree
30. Cupcake Liner Snowflake DIY
Cupcake liners are soft and easy for kids to fold and cut. Flatten them first for easier handling.
Steps:
- Flatten a white cupcake liner completely
- Fold and cut small shapes along the edges
- Unfold and attach a string loop with glue or tape
31. Beaded Candy Cane Ornament DIY
Beading is great for fine motor skills. Use red and white beads to match the candy cane theme.
Steps:
- Thread red and white beads onto a pipe cleaner or wire
- Curve the top into a candy cane shape
- Twist the ends to secure and hang
32. Paper Chain Mini Ornament DIY
Paper chains are a classic craft made smaller for tree ornaments. Use colorful construction paper for the best look.
Steps:
- Cut thin strips of colorful paper
- Link them into a small chain by gluing the ends together
- Form a circle or loop and hang with a string
Modern & Stylish Christmas Ornaments DIY
Perfect for modern holiday décor, minimalists, or neutral color lovers. Modern Christmas ornaments DIY projects use clean lines, bold colors, and simple shapes.
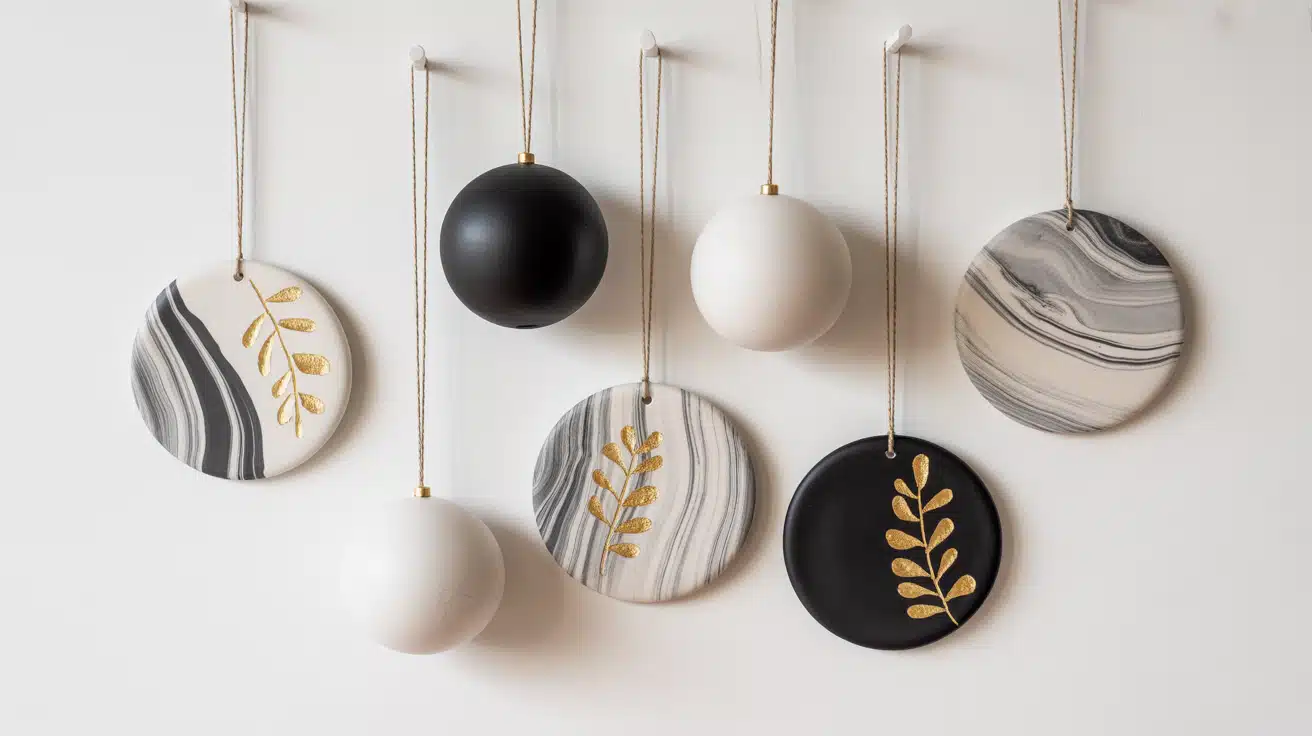
33. Marbled Clay Ornament DIY
Marbled clay looks high-end but takes just a few steps. Mix two or three colors for a swirled effect.
Steps:
- Knead two colors of air-dry clay together partially to create swirls
- Roll flat and cut into circles or geometric shapes
- Let dry completely, and add a ribbon loop
34. Minimalist Black & White Bauble DIY
Black-and-white ornaments fit perfectly on a modern tree. Keep designs simple with stripes, dots, or geometric patterns.
Steps:
- Paint a plain ornament white and let it dry
- Add black lines, dots, or shapes with a fine brush or marker
- Attach a ribbon hanger
35. Gold Leaf Ornament DIY
Gold leaf adds instant luxury to plain ornaments. A little goes a long way for a polished look.
Steps:
- Brush adhesive onto sections of a plain ornament
- Press gold leaf sheets onto the glue gently
- Seal with clear spray and hang
36. Concrete Ornament DIY
Concrete ornaments feel industrial and modern. Use silicone molds for clean edges and smooth finishes.
Steps:
- Mix quick-set concrete and pour it into small molds
- Insert a string loop before it dries completely
- Remove from the mold once dry and hang
37. Acrylic Pour Ornament DIY
Acrylic pouring creates one-of-a-kind patterns. Each ornament turns out completely unique.
Steps:
- Pour mixed acrylic paint over a plain ornament ball
- Rotate slowly to let the paint drip and spread
- Let dry completely and hang
38. Frosted Glass Ornament DIY
Frosted glass spray gives ornaments a snowy, icy look. Pair it with stencils for added detail.
Steps:
- Spray a plain glass ornament with frosted glass coating
- Add a stencil design before the spray dries if desired
- Let dry and hang with ribbon
39. Metallic Stripe Ornament DIY
Stripes are simple but striking on ornaments. Use painter’s tape for sharp, clean lines.
Steps:
- Tape straight lines across a plain ornament
- Paint between the tape with metallic gold, silver, or copper
- Remove tape once dry and hang
40. Geometric Yarn Wrap Ornament DIY
Wrap yarn around cardboard shapes for a textured, modern look. Choose neutral or bold colors depending on your style.
Steps:
- Cut cardboard into geometric shapes like triangles or hexagons
- Wrap yarn tightly around the shape in rows
- Tie off the yarn and add a string loop
41. Minimal Wood Block Ornament DIY
Small wood blocks feel simple and Scandinavian. Paint half for a two-tone effect.
Steps:
- Cut or buy a small wood block about 2 inches long
- Paint the bottom half in white, black, or gray
- Drill a hole and add twine for hanging
42. Black Chalkboard Ornament DIY
Chalkboard ornaments can be customized each year. Write names, dates, or short messages.
Steps:
- Paint a wood slice or ornament with chalkboard paint
- Let it dry and write on it with chalk or a chalk marker
- Hang with ribbon or twine
Farmhouse & Rustic Christmas Ornaments DIY
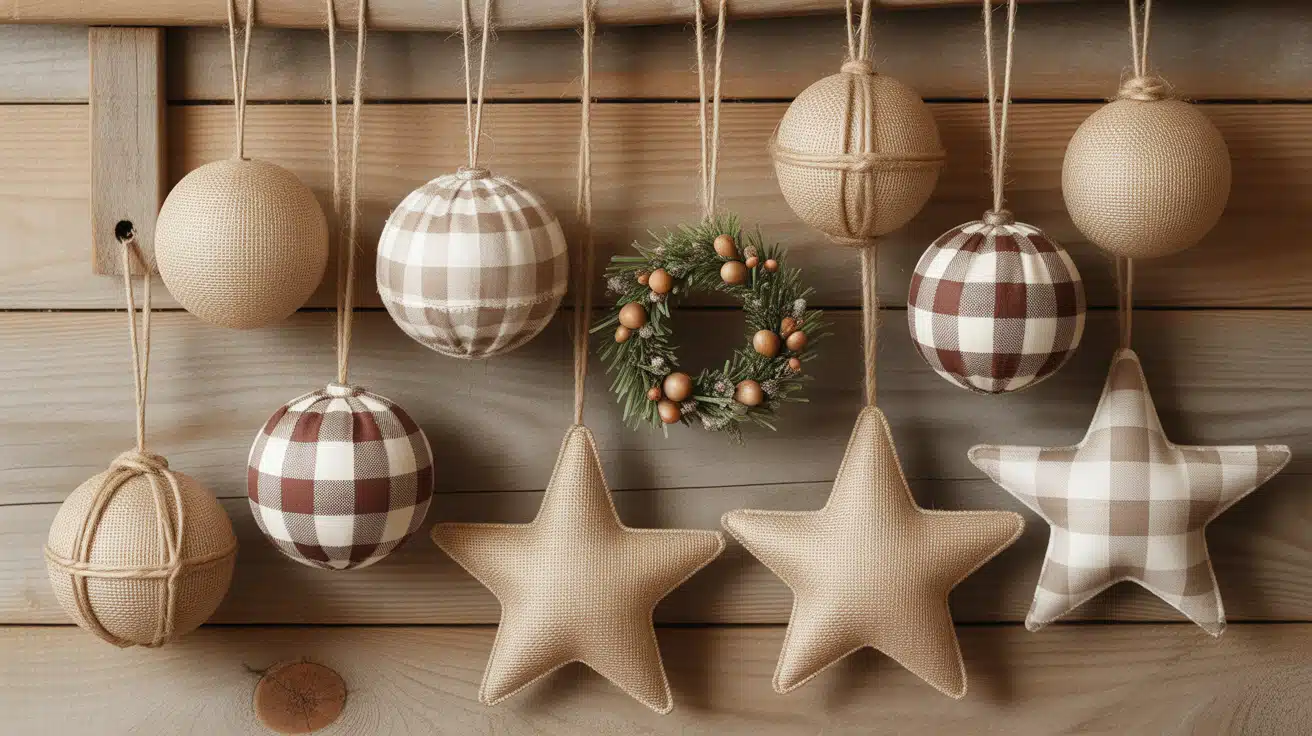
These cozy, textured designs fit perfectly with farmhouse, cabin, or country-style trees. Farmhouse Christmas ornaments DIY ideas use natural materials, muted tones, and simple charm.
43. Burlap Ribbon Ornament DIY
Burlap adds instant farmhouse texture. Wrap it around plain ornaments for a soft, neutral look.
Steps:
- Cut burlap ribbon into strips and wrap around a styrofoam ball
- Secure the ends with hot glue as you go
- Tie twine at the top for hanging
44. Rustic Bell Ornament DIY
Distressed bells look vintage and charming. Add rope or jute for an earthy hanger.
Steps:
- Lightly sand or paint bells to give them a worn look
- Tie them together with thick rope or jute twine
- Add a loop at the top and hang
45. Twine Ball Ornament DIY
Twine balls look delicate but are surprisingly sturdy. The open weave catches light beautifully.
Steps:
- Wrap twine around an inflated balloon in all directions
- Brush glue over the twine and let it dry overnight
- Pop the balloon and hang the twine shell
46. Wood Slice Photo Ornament DIY
Attach family photos to wood slices for personalized keepsakes. Seal them so they last for years.
Steps:
- Glue a small photo to the center of a wood slice
- Brush clear sealant over the photo and wood
- Tie the ribbon through a pre-drilled hole and hang
47. Rustic Star Ornament DIY
Popsicle stick stars feel homemade and cozy. Stain them for a weathered wood look.
Steps:
- Glue 5 Popsicle sticks into a star shape
- Brush on wood stain or brown paint and wipe lightly
- Add twine at one point and hang
48. Plaid Fabric Ornament DIY
Plaid fabric screams farmhouse Christmas. Wrap it around foam balls for a soft, textured ornament.
Steps:
- Cut plaid fabric into strips or squares
- Wrap and pin fabric around a foam ball until covered
- Add a ribbon loop at the top
49. Grain Sack Fabric Ornament DIY
Grain sack stripes give a vintage farmhouse vibe. Stitch small pouches and stuff them lightly.
Steps:
- Cut and sew small fabric pouches from grain sack material
- Stuff lightly with batting or fabric scraps
- Sew closed and add a twine hanger
50. Rustic Ladder Ornament DIY
Mini ladders are trendy in farmhouse décor. Use twigs or small dowels to make them.
Steps:
- Glue small twigs or dowels into a ladder shape
- Let dry completely and add paint or stain if desired
- Attach a string at the top
51. Twine-Wrapped Bauble DIY
Wrap twine around the entire ornament for a fully textured look. It beautifully covers old or damaged ornaments.
Steps:
- Apply hot glue to sections of a ball ornament
- Press and wrap the twine tightly around the glue
- Continue until fully covered and tie off at the top
52. Barn Star Ornament DIY
Barn stars are a farmhouse staple. Make mini versions from cardboard or thin metal.
Steps:
- Fold and cut the cardboard into a barn star shape
- Paint with metallic or matte black paint for a metal finish
- Poke a hole and hang with twine
Upcycled & Eco-Friendly Christmas Ornaments DIY
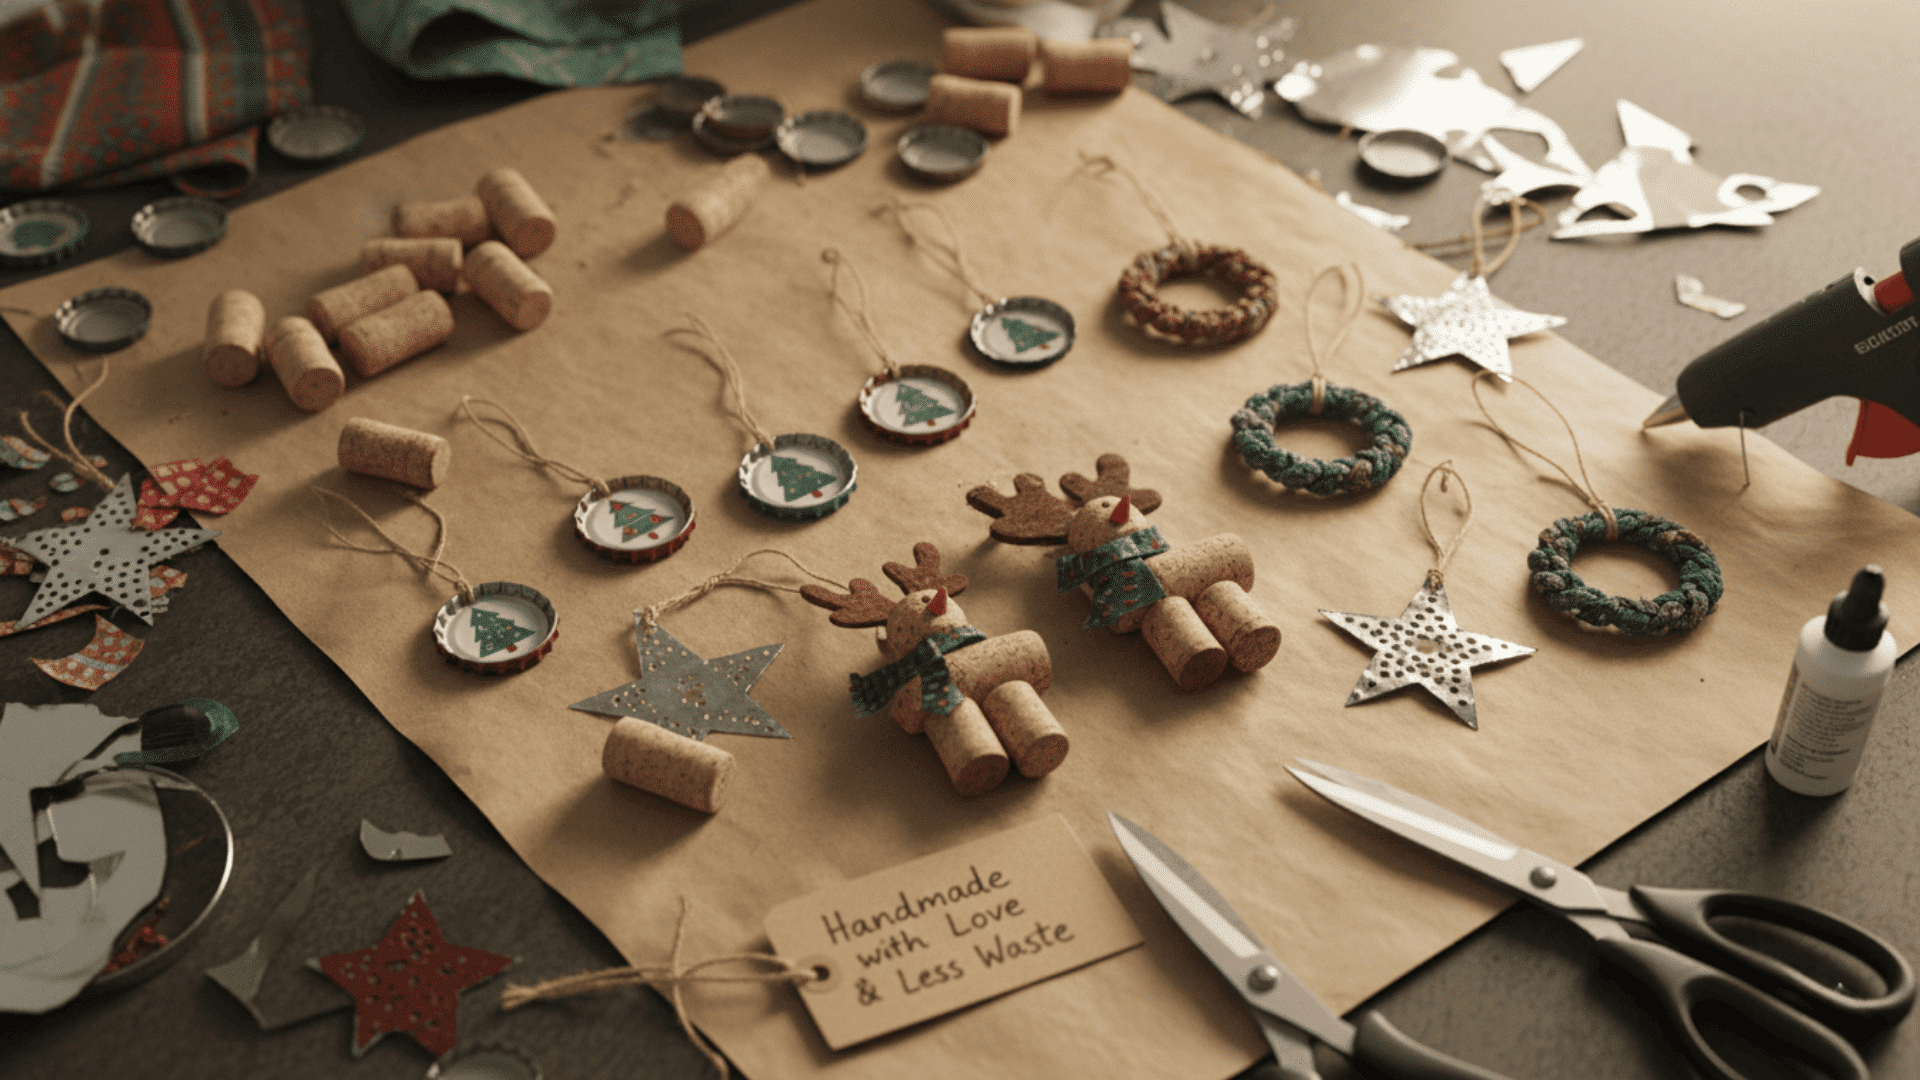
Turn everyday items into beautiful decorations and reduce waste at the same time. Upcycled Christmas ornaments DIY projects are budget-friendly and better for the planet.
53. Bottle Cap Snowman Ornament DIY
Save bottle caps from drinks and turn them into tiny snowmen. Kids love helping with these.
Steps:
- Paint 3 bottle caps white and let them dry
- Glue them into a vertical snowman stack
- Draw face details and add ribbon for hanging
54. Old Sweater Ornament DIY
Turn worn-out sweaters into soft, cozy ornaments. Use cable knit or chunky textures for the best effect.
Steps:
- Cut circles from old sweater fabric
- Sew around the edges, stuff lightly, and close
- Add a ribbon loop at the top
55. Scrap Fabric Star Ornament DIY
Use leftover fabric scraps to make puffy stars. Mix patterns and colors for a patchwork look.
Steps:
- Cut two star shapes from scrap fabric
- Sew edges together, leaving a small gap to stuff
- Fill with batting, sew closed, and add a hanger
56. Mason Jar Lid Ornament DIY
Old mason jar lids make sturdy ornament bases. Decorate the flat insert and screw the ring back on.
Steps:
- Glue fabric, photos, or paper to the flat lid insert
- Screw the metal ring back around it
- Tie twine through the ring and hang
57. Light Bulb Snowman Ornament DIY
Burnt-out light bulbs get a second life as snowman ornaments. Paint them and add fabric scraps for scarves.
Steps:
- Paint a light bulb white and let it dry completely
- Draw or paint a snowman face and buttons
- Wrap a fabric scrap around the neck and attach a wire hanger
58. Paper Tube Angel Ornament DIY
Toilet paper or paper towel tubes work perfectly for angel ornaments. Cover them with paint or paper first.
Steps:
- Cut and shape a paper tube into an angel’s body
- Add paper or fabric wings and paint details
- Hang with a string or ribbon
59. CD Shard Mosaic Ornament DIY
Old CDs reflect light beautifully. Break them into small pieces for a mosaic effect.
Steps:
- Cut or break a CD into small triangular pieces
- Glue pieces onto a cardboard circle in a mosaic pattern
- Add a ribbon hanger at the top
60. Cereal Box Cutout Ornament DIY
Cereal boxes are thick enough to hold their shape. Cover them with paint or scrapbook paper.
Steps:
- Trace ornament shapes onto the cardboard and cut out
- Paint or cover with decorative paper
- Punch a hole and add a string
61. Wine Cork Reindeer Ornament DIY
Save wine corks to make adorable reindeer ornaments. Add googly eyes and pipe cleaner antlers.
Steps:
- Glue two or three corks together for the body and head
- Attach small twig or pipe cleaner antlers at the top
- Tie the string around the neck and hang
62. Tin Can Lid Snowflake DIY
Tin can lids can be cut into snowflake patterns. Paint them white or silver for a wintry look.
Steps:
- Use tin snips to carefully cut a snowflake design into a clean lid
- Paint the lid and let it dry
- Attach the string with glue or wire
Personalized Christmas Ornaments DIY
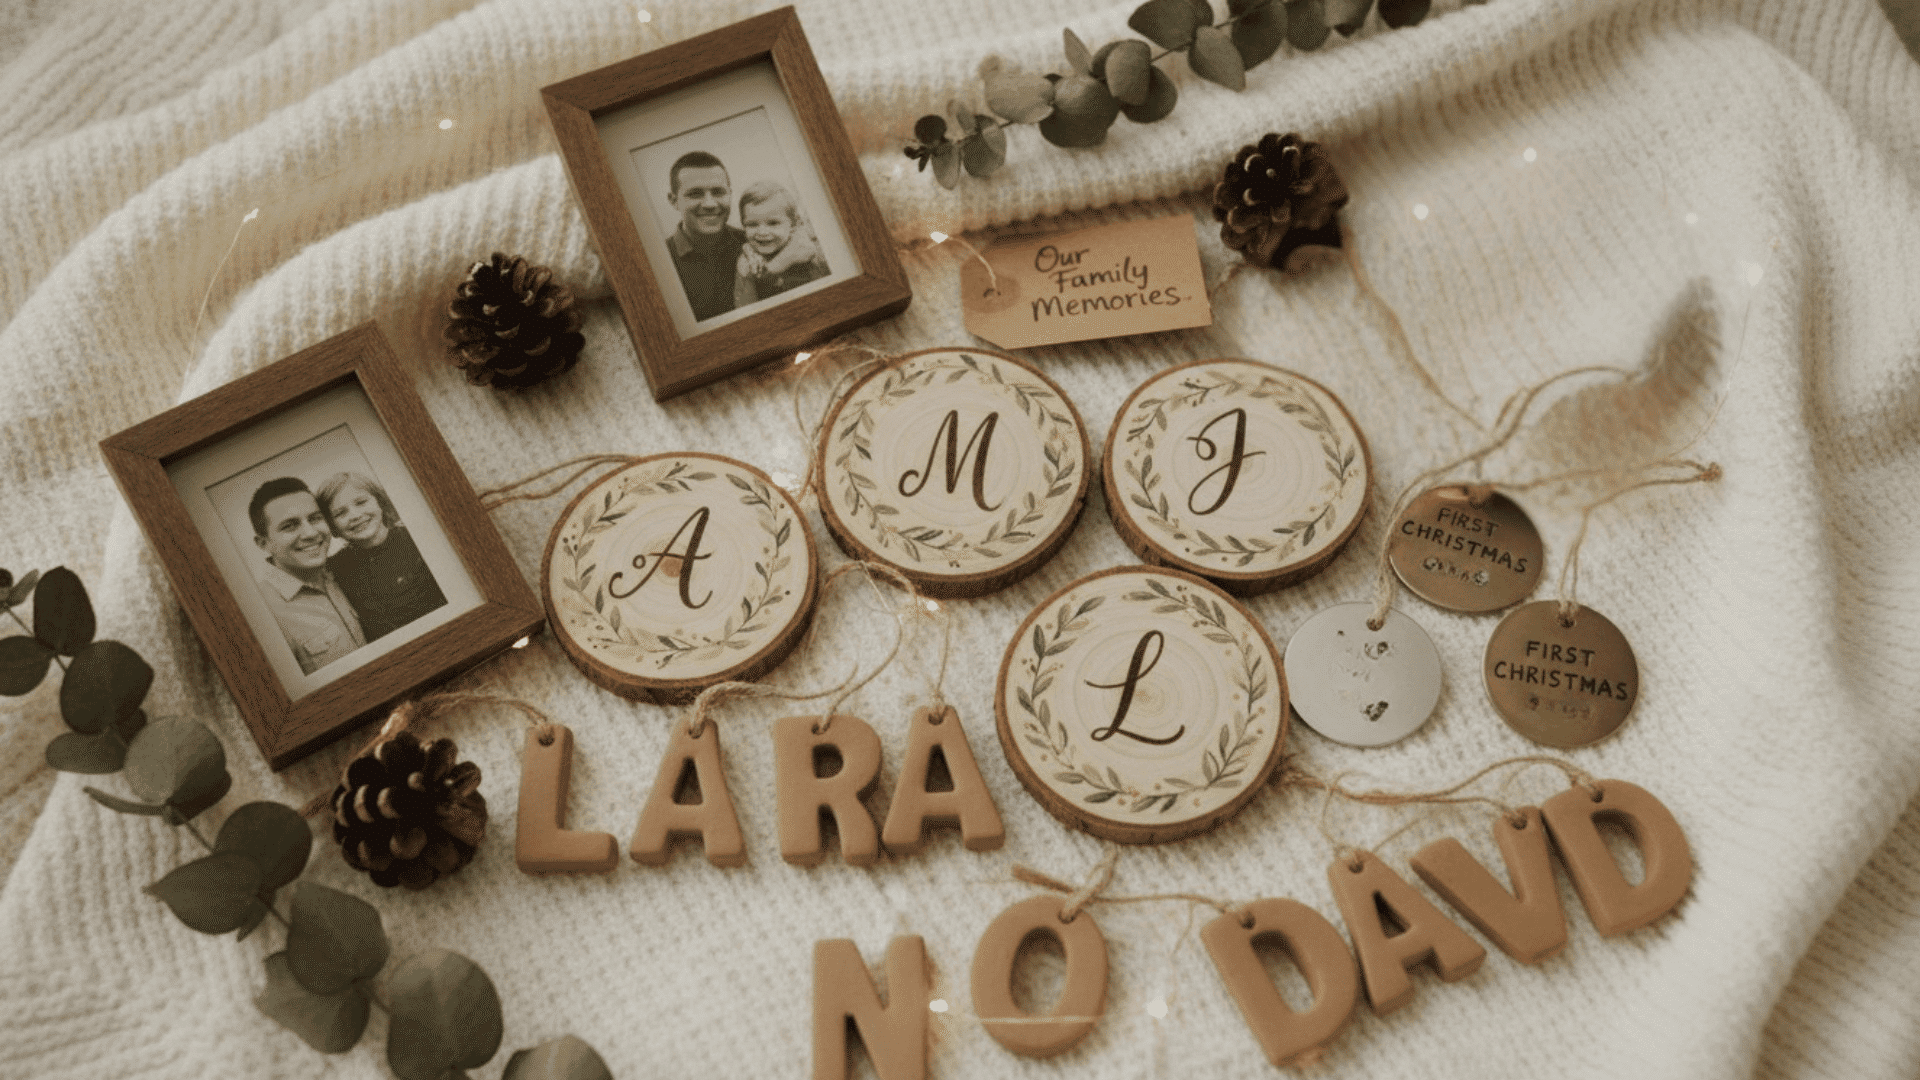
These meaningful keepsakes make beautiful gifts and treasured memories. Personalized Christmas ornaments DIY projects let you add names, dates, and special touches.
63. Photo Frame Ornament DIY
Tiny photo frames hold your favorite memories on the tree. Choose photos from the past year or holiday moments.
Steps:
- Insert a small photo into a mini ornament frame
- Glue the frame closed securely
- Add ribbon at the top for hanging
64. Name Tag Bauble DIY
Write family names on ornaments for a custom look. Use vinyl letters or permanent markers.
Steps:
- Write names on ornaments using a paint pen or vinyl letters
- Let dry completely if using paint
- Hang with ribbon or the existing ornament hook
65. Monogram Clay Ornament DIY
Shape clay initials for a personal touch. These work great as gifts or wedding keepsakes.
Steps:
- Roll air-dry clay and cut or shape into a letter
- Let the clay dry completely overnight
- Add a string through a pre-made hole and hang
66. Initial Wood Slice Ornament DIY
Burn or paint initials onto wood slices. Seal them to protect the design.
Steps:
- Paint or wood-burn a single initial onto a wood slice
- Brush clear sealant over the surface
- Tie the twine through the hole and hang
67. Yearly Memory Ornament DIY
Document each year with a special ornament. Include the year and a small keepsake or note.
Steps:
- Write the year on a clear ornament or wood slice
- Add small items like confetti, tickets, or tiny photos inside
- Seal and hang with ribbon
68. Pet Paw Print Ornament DIY
Capture your pet’s paw print in clay. These make sweet gifts for pet lovers.
Steps:
- Press your pet’s paw gently into rolled air-dry clay
- Cut around the print and poke a hole at the top
- Let dry and hang with ribbon
69. Engraved Wood Ornament DIY
Wood-burning tools let you add names, dates, or designs. Sand lightly for a smooth finish.
Steps:
- Use a wood-burning tool to write letters or draw designs
- Sand the edges lightly to remove rough spots
- Add a string through a drilled hole
70. Wedding Date Ornament DIY
Celebrate anniversaries with ornaments marking your wedding date. Add both names for a complete keepsake.
Steps:
- Write the wedding date on a wood slice or ornament
- Glue on small décor like faux flowers or ribbon
- Hang with twine or ribbon
71. Baby’s First Christmas DIY Ornament
Mark baby’s first holiday with a custom ornament. Include name, year, and birth details if desired.
Steps:
- Add the baby’s name and year to a bauble or wood slice
- Decorate with paint, stickers, or vinyl letters
- Hang and save as a keepsake
72. Family Name Ornament DIY
Paint your family surname for a cohesive tree theme. Add greenery or plaid ribbon for extra charm.
Steps:
- Paint your last name on a wood slice or large ornament
- Add small decorations like faux greenery or berries
- Attach a string at the top and hang
Tips for Getting Long-Lasting DIY Ornaments
Making ornaments is fun, but you want them to last for years. Follow these four simple tips to keep your handmade decorations looking fresh season after season.
- Let everything dry fully: Paint, glue, and clay need real drying time for a smooth, durable finish.
- Use quality adhesive: A hot glue gun or strong craft glue works best for long-term hold.
- Seal-painted ornaments: A clear spray sealant prevents chipping, fading, and glitter shedding.
- Store ornaments safely: Wrap each one in tissue and keep them in a sturdy box so they last for years.
These small steps make a big difference in how your Christmas ornaments and DIY projects hold up over time. A little care now means you’ll enjoy them for many holidays to come.
Final Thoughts
Making your own Christmas ornaments DIY projects is one of the simplest ways to add warmth, personality, and creativity to your holiday season.
From rustic pinecones to modern marbled clay, there’s something here for every style and skill level.
With easy ideas at your fingertips, you can fill your tree with handmade charm, create thoughtful gifts, and build lasting memories with your family.
Each ornament tells a story and makes your home feel truly yours.
Ready to start crafting? Pick your favorite category, gather a few supplies, and let your creativity shine this Christmas. Which ornament will you make first? Share your creations in the comments below!