Are you tired of spending money on expensive planters when you have perfectly good materials sitting around your house?
Creating beautiful planters doesn’t have to be expensive or harm the environment. With a little creativity and basic tools, you can transform everyday waste into stunning plant homes.
Many people discard items that could easily be repurposed as perfect planters.
Tissue boxes, old boots, lampshades, and baskets all have potential for reuse. The best part? You’re helping reduce waste while creating something useful.
In this blog, I’ll show you how to make different DIY planters using recycled materials. You’ll learn which items work best and get simple instructions for each project.
Why Choose Recycled Materials for Your Planters?
Using recycled materials for planters not only saves money but also helps the environment.
You can find amazing items at thrift stores, yard sales, or around your house that make perfect plant containers.
The key is looking at everyday objects with fresh eyes and seeing their potential as beautiful planters. If your home has classic trim, gable pediments can inspire a matching planter style with clean lines and natural tones. Paint, stain, or wrap your recycled container to echo those shapes so the finished piece looks intentional on a porch or entry.
15 Creative DIY Planter Ideas from Household Items
Change these common items into pretty planters with simple techniques and basic materials.
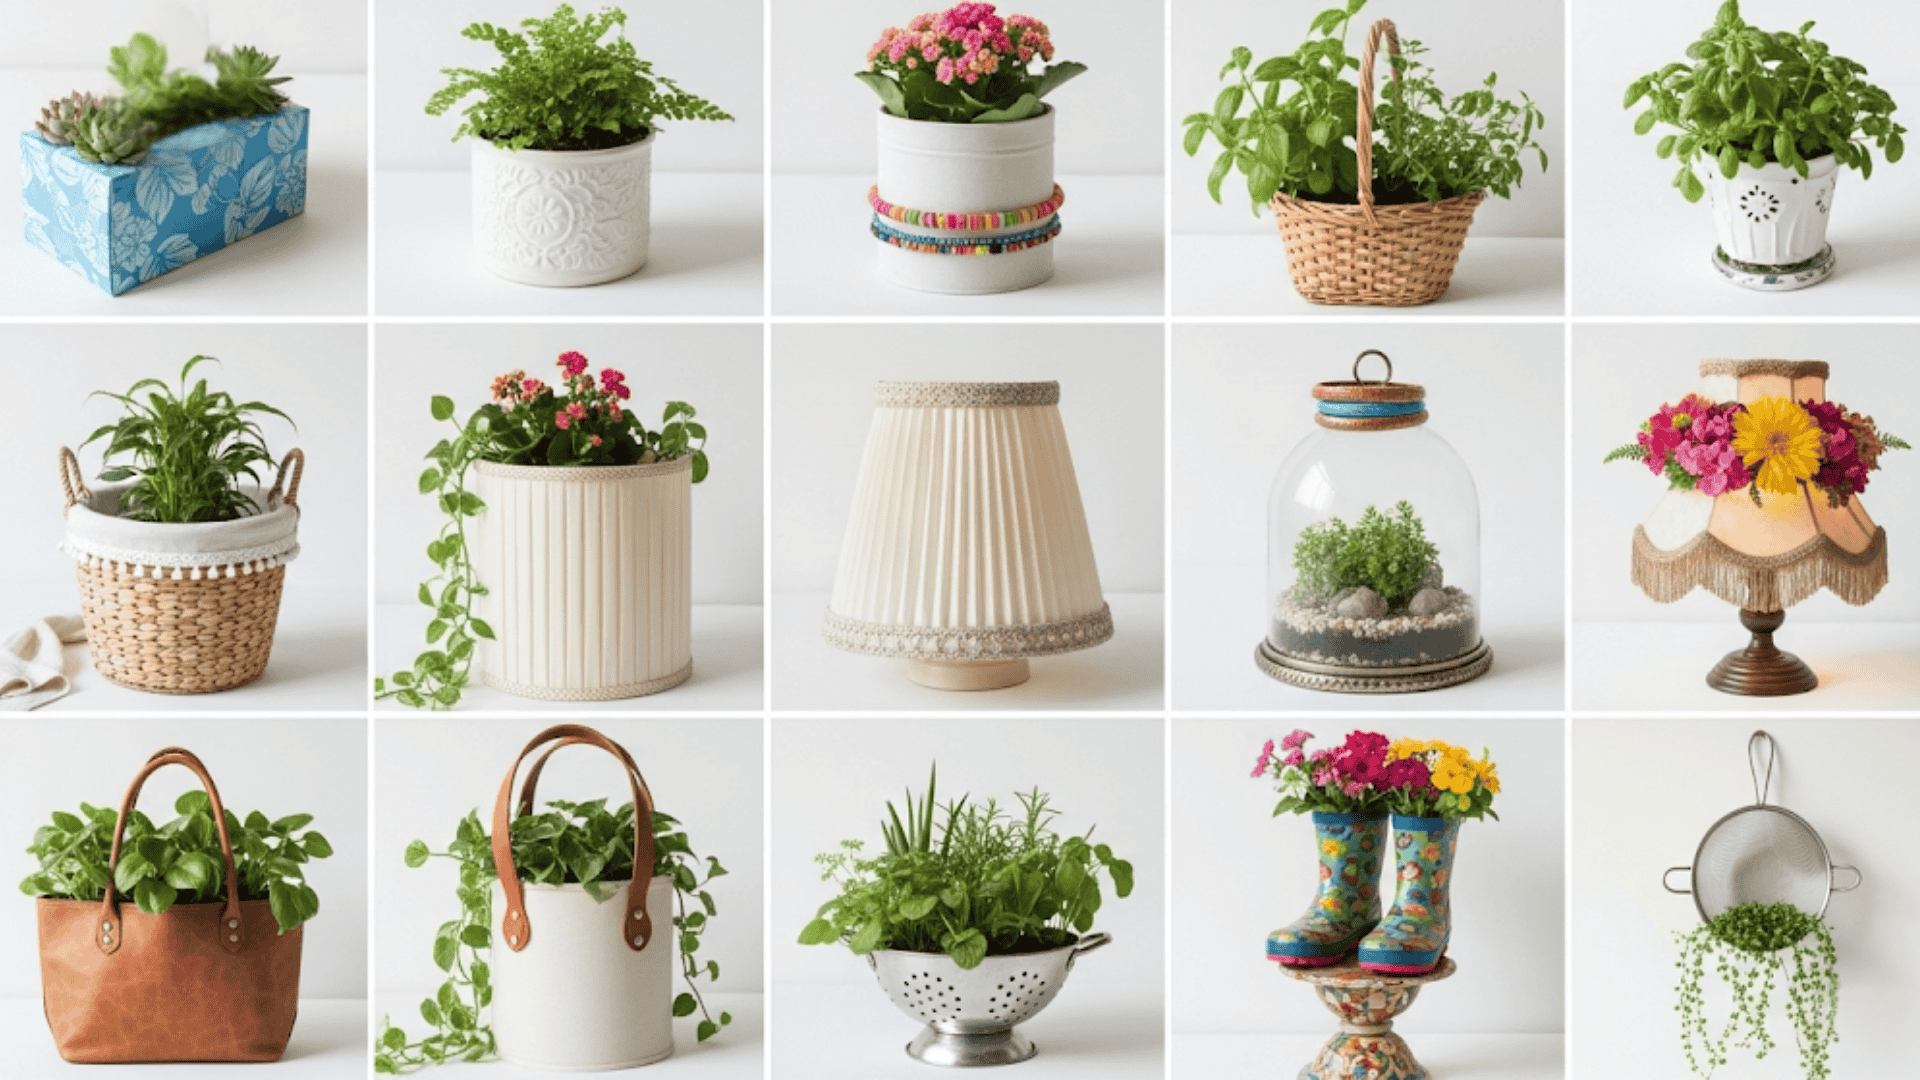
1. Tissue Box Holders
Flip tissue box covers upside down for instant planters with built-in style. The opening at the bottom works perfectly with a recycled water bottle liner.
Materials: Tissue box holder, water bottle, brown craft paint, E6000 glue
Steps:
- Flip the tissue holder upside down
- Paint unfinished edges with craft paint
- Cut a water bottle to fit as a liner
- Add drainage holes to the bottle bottom
- Optional: Create a base from a plastic container lid
2. Ceramic Containers with Embossed Details
Square ceramic pieces with decorative patterns make elegant planters. Cut a water bottle liner to protect the container from soil and water damage.
Materials: Ceramic container, water bottle liner, faux or live plants
Steps:
- Select a ceramic container with drainage potential
- Cut the water bottle to fit inside
- Add plants or faux greenery
- Place a liner inside the container
3. Thrift Store Baskets
Small woven baskets become perfect plant covers when you remove the handles. They add boho style and are incredibly affordable at thrift stores.
Materials: Small basket, wire cutters, potted plant, or faux greens
Steps:
- Snip off the basket handles with wire cutters
- Clean the basket thoroughly
- Insert a potted plant directly
- Add faux greens if preferred
4. Large Baskets with Bead Necklace Trim
Transform plain baskets into luxurious planters by adding decorative bead necklaces around the rim. This creates an upscale look for pennies.
Materials: Large basket, bead necklace, hot glue, E6000 glue, wire cutters
Steps:
- Keep the necklace clasp intact while gluing
- Apply hot glue along the basket rim
- Press the necklace into the glue, adding E6000 under the larger beads
- Cut the excess necklace with wire cutters
- Insert the plant with the original container
5. Elastic Bead Bracelets on Plain Containers
Stretch colorful elastic bracelets over plain containers for an instant decorative touch. This works especially well with seashell or decorative bead bracelets.
Materials: Plain container, elastic bead bracelet, optional glue
Steps:
- Clean container surface
- Stretch the bracelet over the container
- Position the bracelet for the best look
- Add a small amount of glue for permanence
6. Bangle Bracelets with Vanity Light Covers
Combine bangle bracelets with glass vanity light covers for unique planters. The bracelet adds color while the glass provides plant protection.
Materials: Vanity light cover, bangle bracelet, plastic insert for drainage
Steps:
- Clean glass light cover
- Slide the bangle bracelet over the cover
- Position the bracelet as a decorative accent
- Add a plastic insert if using live plants
7. Cylinder Lampshades
Small cylinder lampshades work perfectly as planter covers. The lamp attachment bar across the bottom leaves interior space clear for plants.
Materials: Cylinder lampshade, small terracotta pot, paint for pot rim
Steps:
- Remove any lamp hardware
- Test fit with terracotta pot
- Paint the visible pot rim to match the shade
- Insert the planted pot into the shade
8. Pleated Lampshades with Metal Ribbing
Remove lamp attachments from pleated shades to create textured planters. Add stretchy bracelets between metal ribs for extra decoration.
Materials: Pleated lampshade, wire cutters, stretchy bracelet, gold paint
Steps:
- Cut out lamp attachment hardware
- Clean the interior thoroughly
- Add a stretchy bracelet between ribs
- Paint the pot rim to coordinate with the colors
9. Fringed Lampshades on Stands
Jazz up fringed lampshades by removing interior rims and creating elevated stands. This shows off decorative fringe while housing plants.
Materials: Fringed lampshade, wine barrel planter, PVC pipe, matching spray paint, E6000 glue
Steps:
- Remove interior lamp rim (may pop off easily)
- Cut the PVC pipe into 3-inch pieces for legs
- Spray paint the PVC to match the shade
- Glue PVC legs to the planter bottom
- Insert the planted container into the elevated shade
10. Faux Leather Tote Bags
Turn inside out for beautiful suede texture and rich color. Remove handles and reshape with waste basket inserts for structure.
Materials: Faux leather tote, scissors, waste paper basket, foam wreath, packing tape, spray paint
Steps:
- Cut off handles and save for other projects
- Turn the bag inside out for a suede texture
- Cut off the bottom of the bag
- Insert a waste basket with a foam wreath taped to the bottom
- Paint the visible basket rim to match
- Hot glue and secure the bag bottom with E6000
11. Cylinder Lampshades with Handles
Add saved tote bag handles to cylinder lampshades for a worldly-wise look. The handles create elegant carrying options for plant arrangements.
Materials: Cylinder lampshade, saved tote handles, hot glue, plastic container liner
Steps:
- Clean the lampshade thoroughly
- Hot glue handles over the existing decorative strip
- Cut a plastic container to fit as a liner
- Insert liner and add plants
12. Children’s Boots with Stands
Kids’ boots make charming small planters and cost less than adult sizes. Add a candle holder to stand for better proportion and drainage.
Materials: Children’s boots, candle holder, balsa wood, brown craft paint, clear matte varnish
Steps:
- Flip the candle holder upside down as a base
- Cut balsa wood to cover the hole and create a platform
- Glue the wood pieces together and attach them to the stand
- Paint the wood and boot details with brown paint
- Apply clear varnish to the entire boot
- Glue the boot to the finished base
13. Stretch Dresses over Buckets
Spandex dresses stretch perfectly over 5-gallon buckets for fabric-covered planters. Choose dresses with appealing colors and patterns.
Materials: Spandex dress, 5-gallon bucket, scissors, spray paint if needed
Steps:
- Lay the dress flat and cut off at the desired length
- Remove bucket handles by prying off
- Slide the dress over the bucket
- Tuck the dress edges over the bucket rim
- Adjust the fabric around the bottom for a clean look
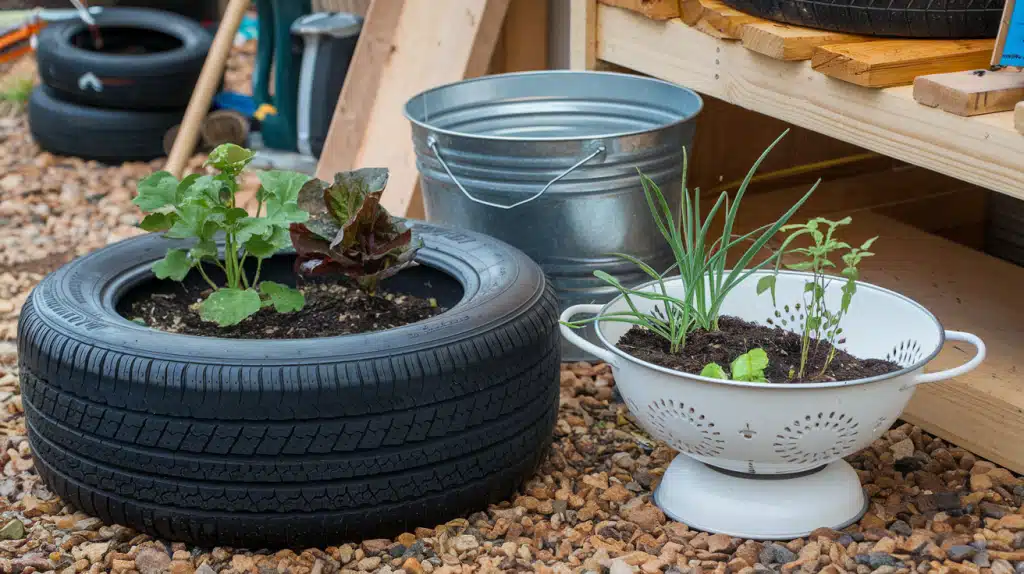
14. Metal Colanders for Herbs
Kitchen colanders already have drainage holes and are made from food-safe materials. Add a landscape fabric liner to contain soil while allowing drainage.
Materials: Metal colander, landscape fabric, scissors, soil, herbs
Steps:
- Clean the colander thoroughly
- Line interior with landscape fabric
- Add soil directly on top of the fabric
- Trim excess fabric around edges
- Plant herbs and secure fabric with a small amount of glue
15. Large Metal Sieves for Hanging Gardens
Metal sieves work like colanders but can be mounted for vertical growing. Perfect for deck railings and garden structures.
Materials: Large metal sieve, landscape fabric, metal mounting brace, soil, plants
Steps:
- Line sieve with landscape fabric
- Fill with appropriate soil
- Attach the mounting brace tothe handle
- Secure to the deck railing or garden structure
- Plant with trailing or upright varieties
Video Tutorial
I’d like to acknowledge FABEDhacks for the insightful video, which served as a key reference in compiling this guide.
How to Keep Your DIY Planters Looking Great?
Proper care ensures your recycled planters stay beautiful and functional for years to come.
- Weekly Checks: Water when the top inch of soil feels dry to the touch.
- Monthly Tasks: Clean exterior surfaces and rotate plants for even sun exposure.
- Seasonal Care: Refresh potting soil annually and touch up paint when needed.
- Drainage Testing: Pour water monthly – should drain completely within 30 seconds.
- Weather Protection: Move containers indoors during extreme temperature conditions.
Weatherproofing Your DIY Planters
Protect your beautiful creations from the elements to ensure they last through all seasons.
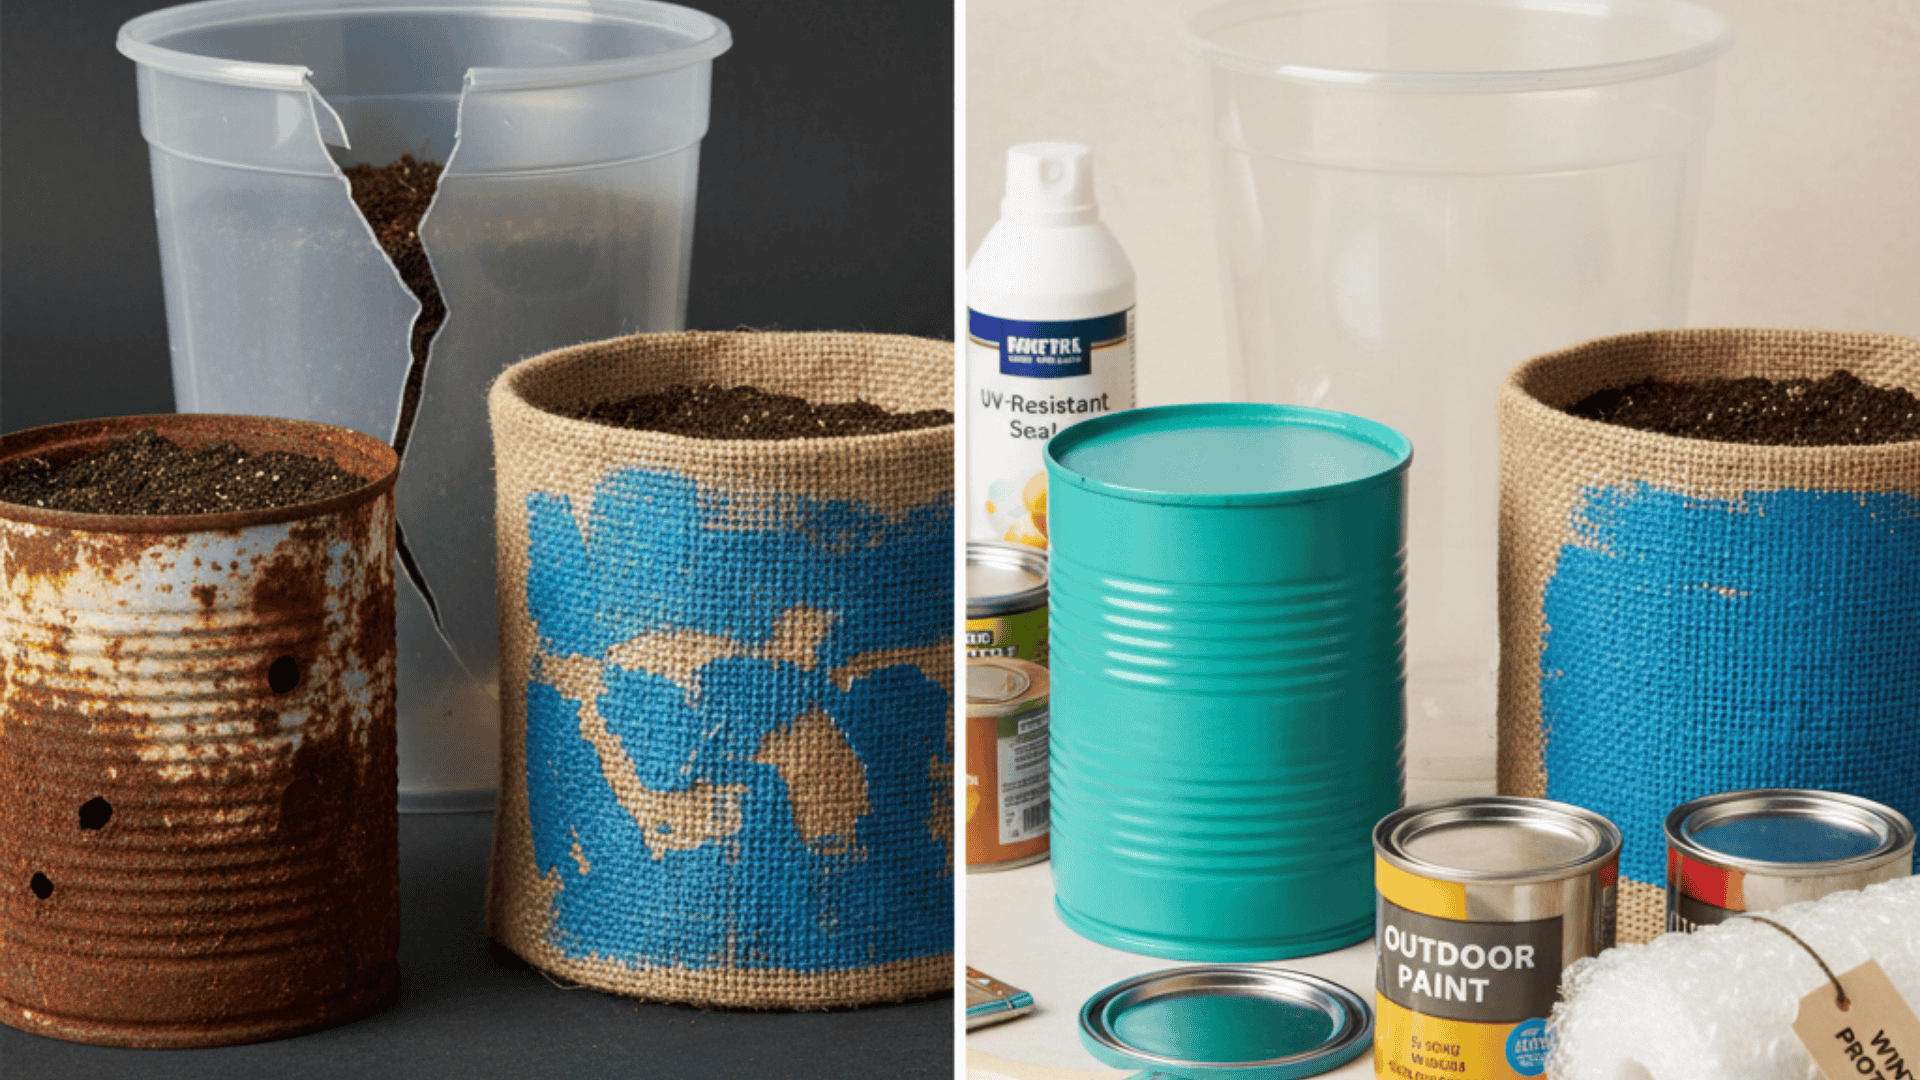
1. For Plastic Planters
- Choose UV-resistant paint if painting
- Avoid direct afternoon sun to prevent cracking
- Bring indoors during extreme weather
2. For Metal Planters
- Apply rust-resistant primer before painting
- Use outdoor paint designed for metal
- Check for rust regularly and touch up paint
3. Winter Protection
- Move containers to sheltered areas
- Wrap with bubble wrap for insulation
- Empty and store if freezing is expected
Avoid These Common DIY Planter Fails
Learn from these frequent errors that can ruin your DIY planter projects:
| Mistake | Problem | Solution |
|---|---|---|
| No drainage holes | Plants die from root rot | Always add drainage holes to the bottom |
| Using chemical containers | Harmful residue affects plants | Only use food-safe containers |
| Wrong container size | Plants become root-bound quickly | Match container size to plant needs |
| Skipping the liner step | Soil stains and damages the container | Use plastic bottle liners always |
| Poor handle removal | Sharp edges can cut hands | File down all rough edges carefully |
| Inadequate cleaning | Old residue harms plant growth | Clean containers thoroughly before use |
| No weatherproofing | Containers crack from the weather | Apply appropriate sealers for outdoors |
Final Thoughts
Creating planters from recycled materials is one of the most eco-friendly and cost-effective ways to decorate your home and garden.
These creative ideas demonstrate how everyday items can be transformed into beautiful plant containers with just a few simple steps and basic materials.
The best part about recycled planters is that each one is unique and tells its own story.
From tissue box holders to children’s boots, these projects demonstrate that creativity can be more cost-effective than purchasing expensive planters from stores.
Start with a simple project, such as a tin can herb planter or a basket makeover. Once you see how easy and rewarding it is, you’ll start looking at thrift store finds with completely different eyes.
What unused items do you have around your house that could become your next planter project? Share your creative ideas or ask questions in the comments below!