Thanksgiving brings family, gratitude, and delicious food to your home. But before you plan the menu, think about your table setting.
A beautiful centerpiece can change your dining space into a warm, festive spot that impresses everyone. Want to add a personal touch this year? Try making a DIY Thanksgiving centerpiece.
In this guide, you’ll learn diy and easy, lovely centerpiece ideas that work for any style. From natural pumpkin designs to traditional garlands, you’ll find something perfect.
Let’s get your table ready for the holidays!
Why Choose DIY Thanksgiving Centerpieces?
Creating your own Thanksgiving centerpiece brings real benefits to your holiday table. You save money by using materials you already own at home.
You get to express your personal style and creativity in ways store-bought options can’t match. Most importantly, there’s genuine satisfaction in showing guests something you made yourself.
Here’s what makes DIY centerpieces worth your time:
- Saves Money: DIY projects cost much less than store-bought versions. You can reuse items from around your house.
- Shows Your Style: Homemade pieces let you pick colors and themes that match your taste. You can add family traditions, too.
- Gives Creative Freedom: You control every detail. Rustic, modern, or simple—the choice is yours.
- Feels Rewarding: Making your own decor brings real pride. Your guests will notice the effort and love you put in.
3 Easy DIY Thanksgiving Centerpieces Step-by-Step
Learn how to create beautiful, budget-friendly Thanksgiving centerpieces with simple materials you already have at home. Follow these easy step-by-step tutorials to make your holiday table unforgettable.
Tools and Materials for DIY Thanksgiving Centerpieces
Before you start, gather these basic supplies. Most items are easy to find at craft stores or in your home.
| What You Need | Why You Need It |
|---|---|
| Scissors or floral cutters | Cut stems and greenery |
| Floral tape and skewers | Secure items in place |
| Glue gun | Add extra hold |
| Container or tray | Base for your centerpiece |
| Floral foam | Keep everything stable |
| Moss and greenery | Add natural texture |
| Pumpkins (various sizes) | Main focal point |
| Sunflowers or fall flowers | Bright color accents |
| Burlap ribbon | Finishing touch |
| Pinecones, berries, acorns | Complete the fall look |
Pro Tip: Check your home first before shopping. This saves money and gets you started faster.
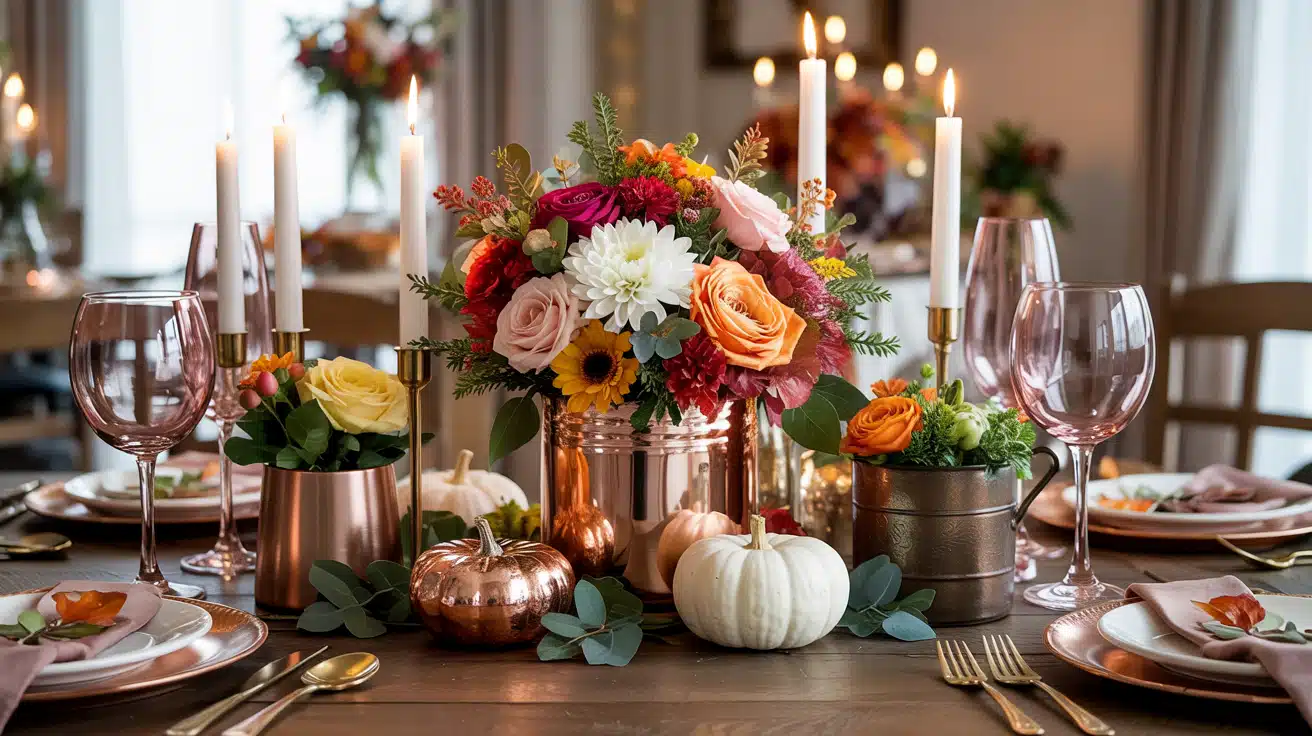
DIY #1: A Full, Natural Centerpiece with a Pumpkin Focal Point
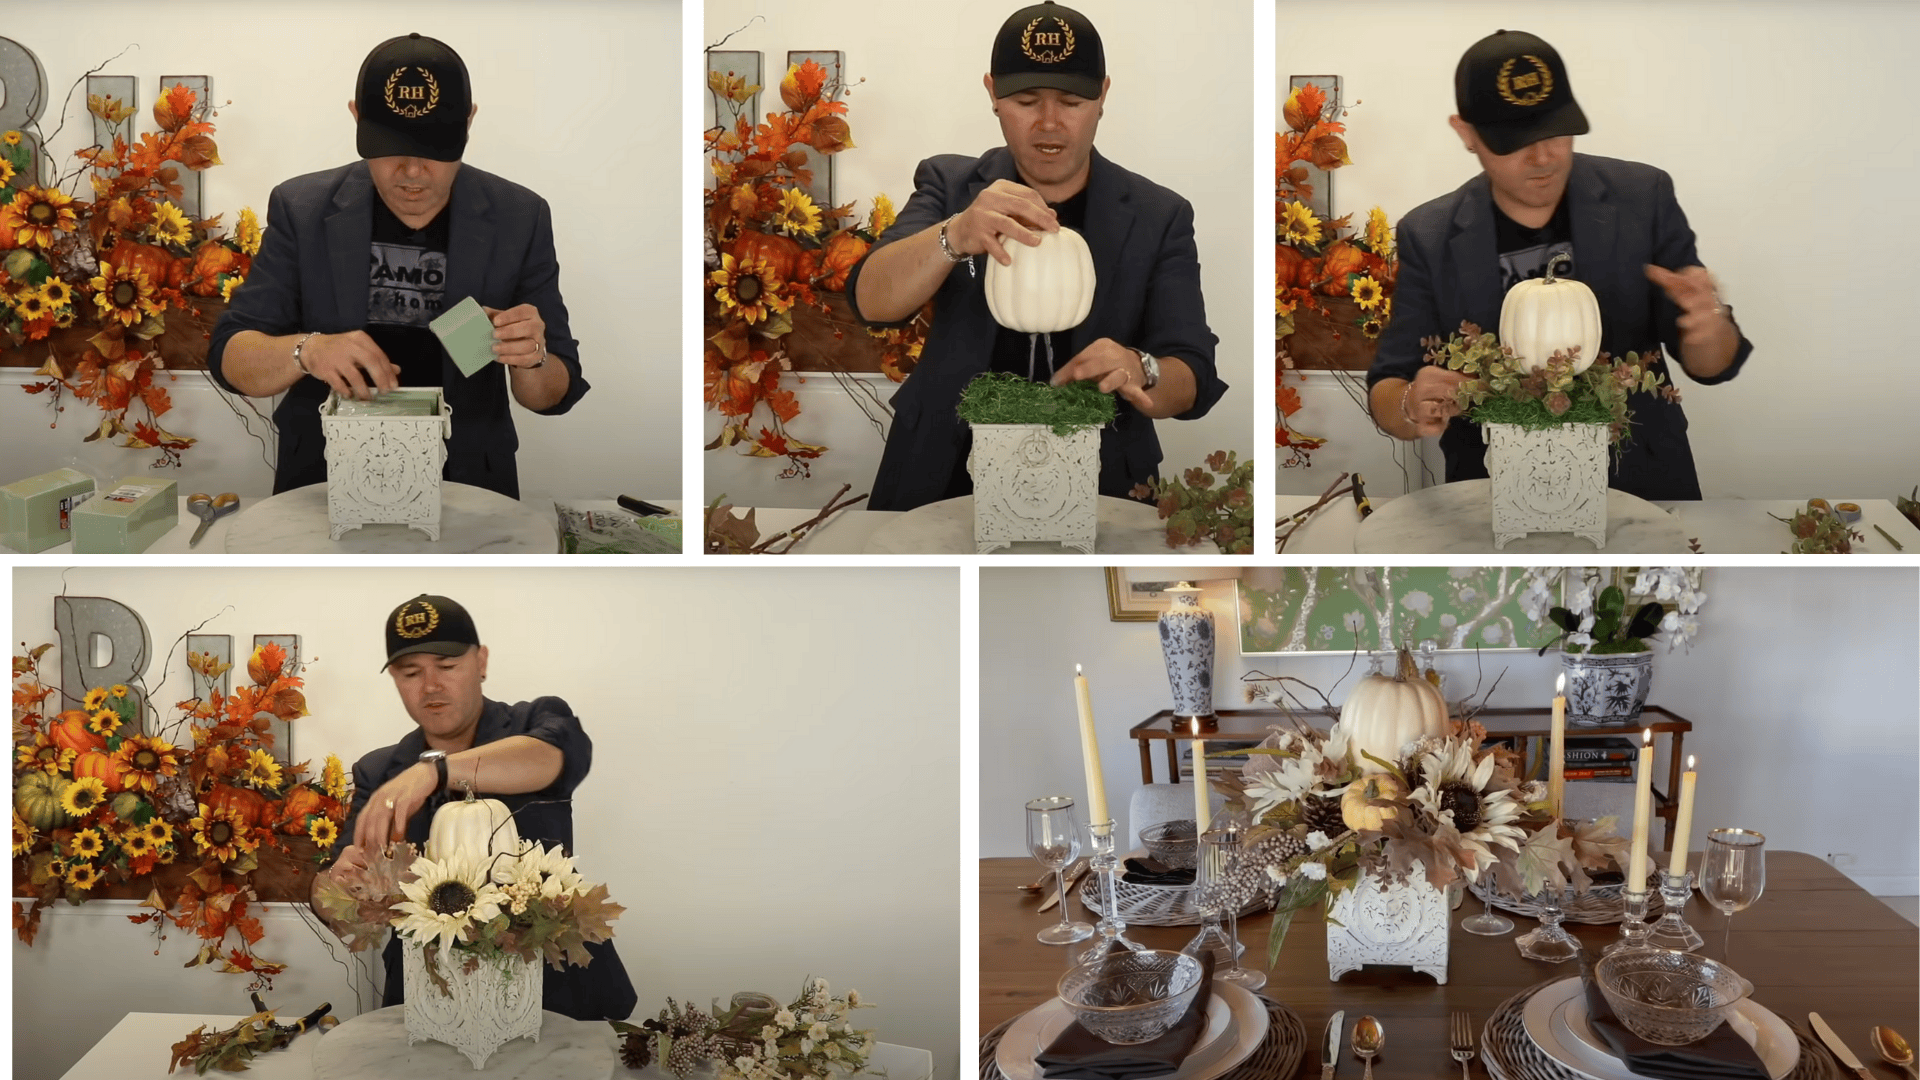
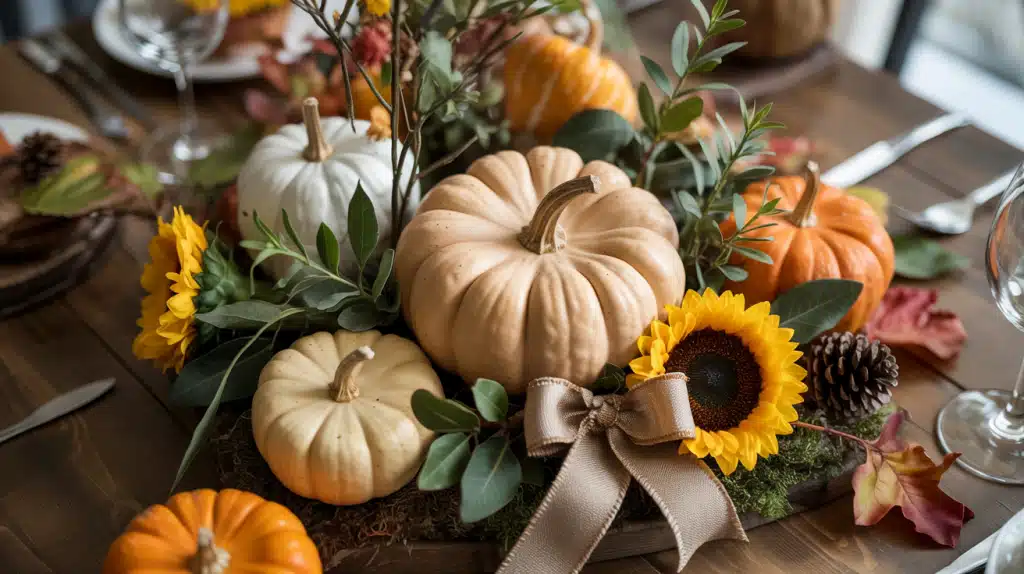
This centerpiece gives you a natural, earthy look that feels warm and welcoming. A cream-colored pumpkin sits at the center, surrounded by greenery and bright flowers. It’s perfect for anyone who loves organic, textured designs.
Step 1: Prep the Container. Place floral foam at the bottom of your container. This creates a stable base for everything else.
Step 2: Add Moss. Stretch the moss and wrap it tightly around the foam. This gives your centerpiece a natural, organic feel.
Step 3: Insert the Pumpkin. Use skewers or glue to secure the pumpkin in the center. Lift it slightly higher for a more interesting look.
Step 4: Add Greenery. Insert sage green and brown stems around the pumpkin. Angle them outward to create a spilling effect.
Step 5: Insert Sunflowers. Add sunflowers or seasonal flowers for color. Secure them with skewers to keep them in place.
Step 6: Finish with a Bo.w Make a simple burlap ribbon bow. Attach it to the arrangement for a rustic, soft touch.
DIY#2: A Traditional Garland with Fall Foliage
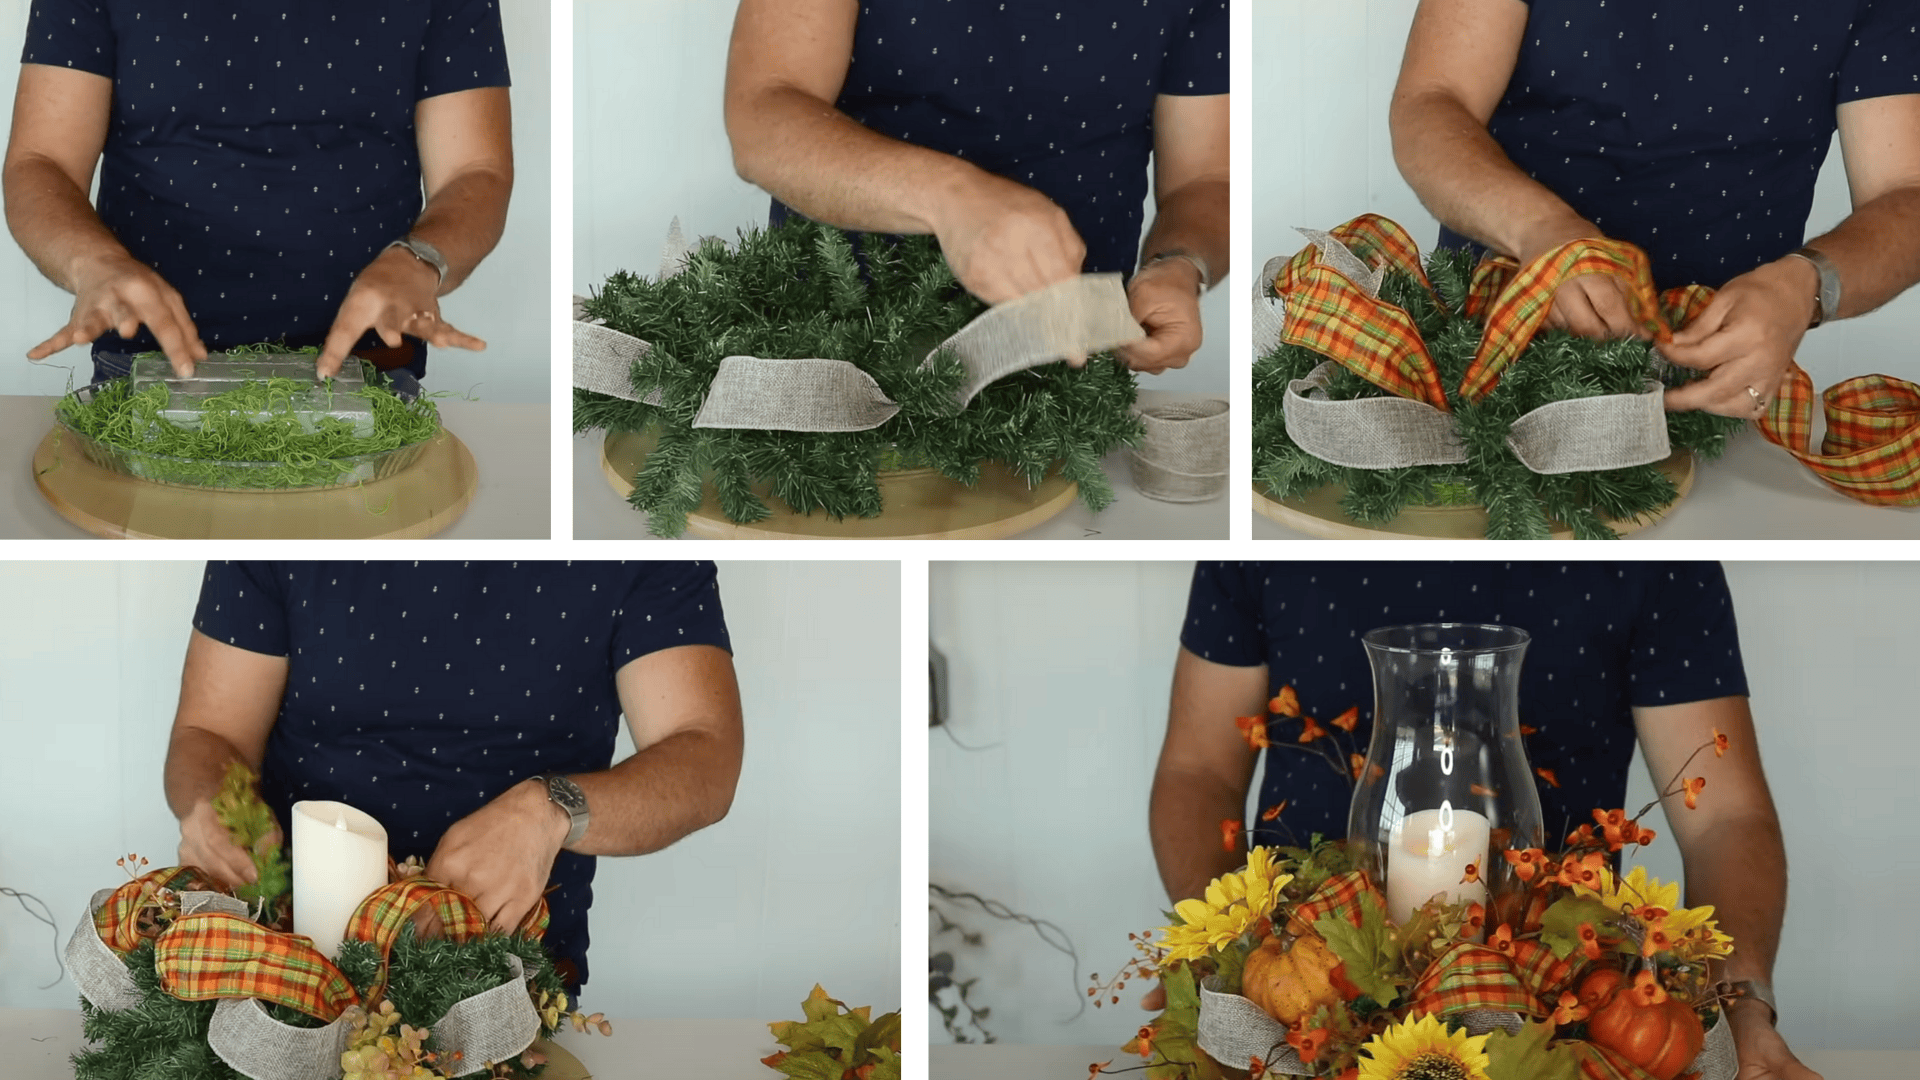
This centerpiece uses a full garland paired with pumpkins and flowers for a classic fall look. Orange, brown, and gold colors give it a traditional, timeless feel. It works well for both formal and family-style tables.
Step 1: Prepare the Container. Put floral foam in a tray or shallow container. Cover the foam with moss for a natural base.
Step 2: Attach the garland. Use floral bristles or wire to secure the garland to the foam. Spread it evenly across the base.
Step 3: Add Foliage Layer boxwood or oak foliage around the garland. This adds texture and fills empty spaces.
Step 4: Insert Pumpkins and Sunflowers. Place small pumpkins and sunflowers into the foam. Space them evenly for balance.
Step 5: Finish with Ribbon. Add loops of burlap ribbon around the arrangement. This brings a polished, refined touch.
DIY #3: Simple Pumpkin with Terracotta Accents
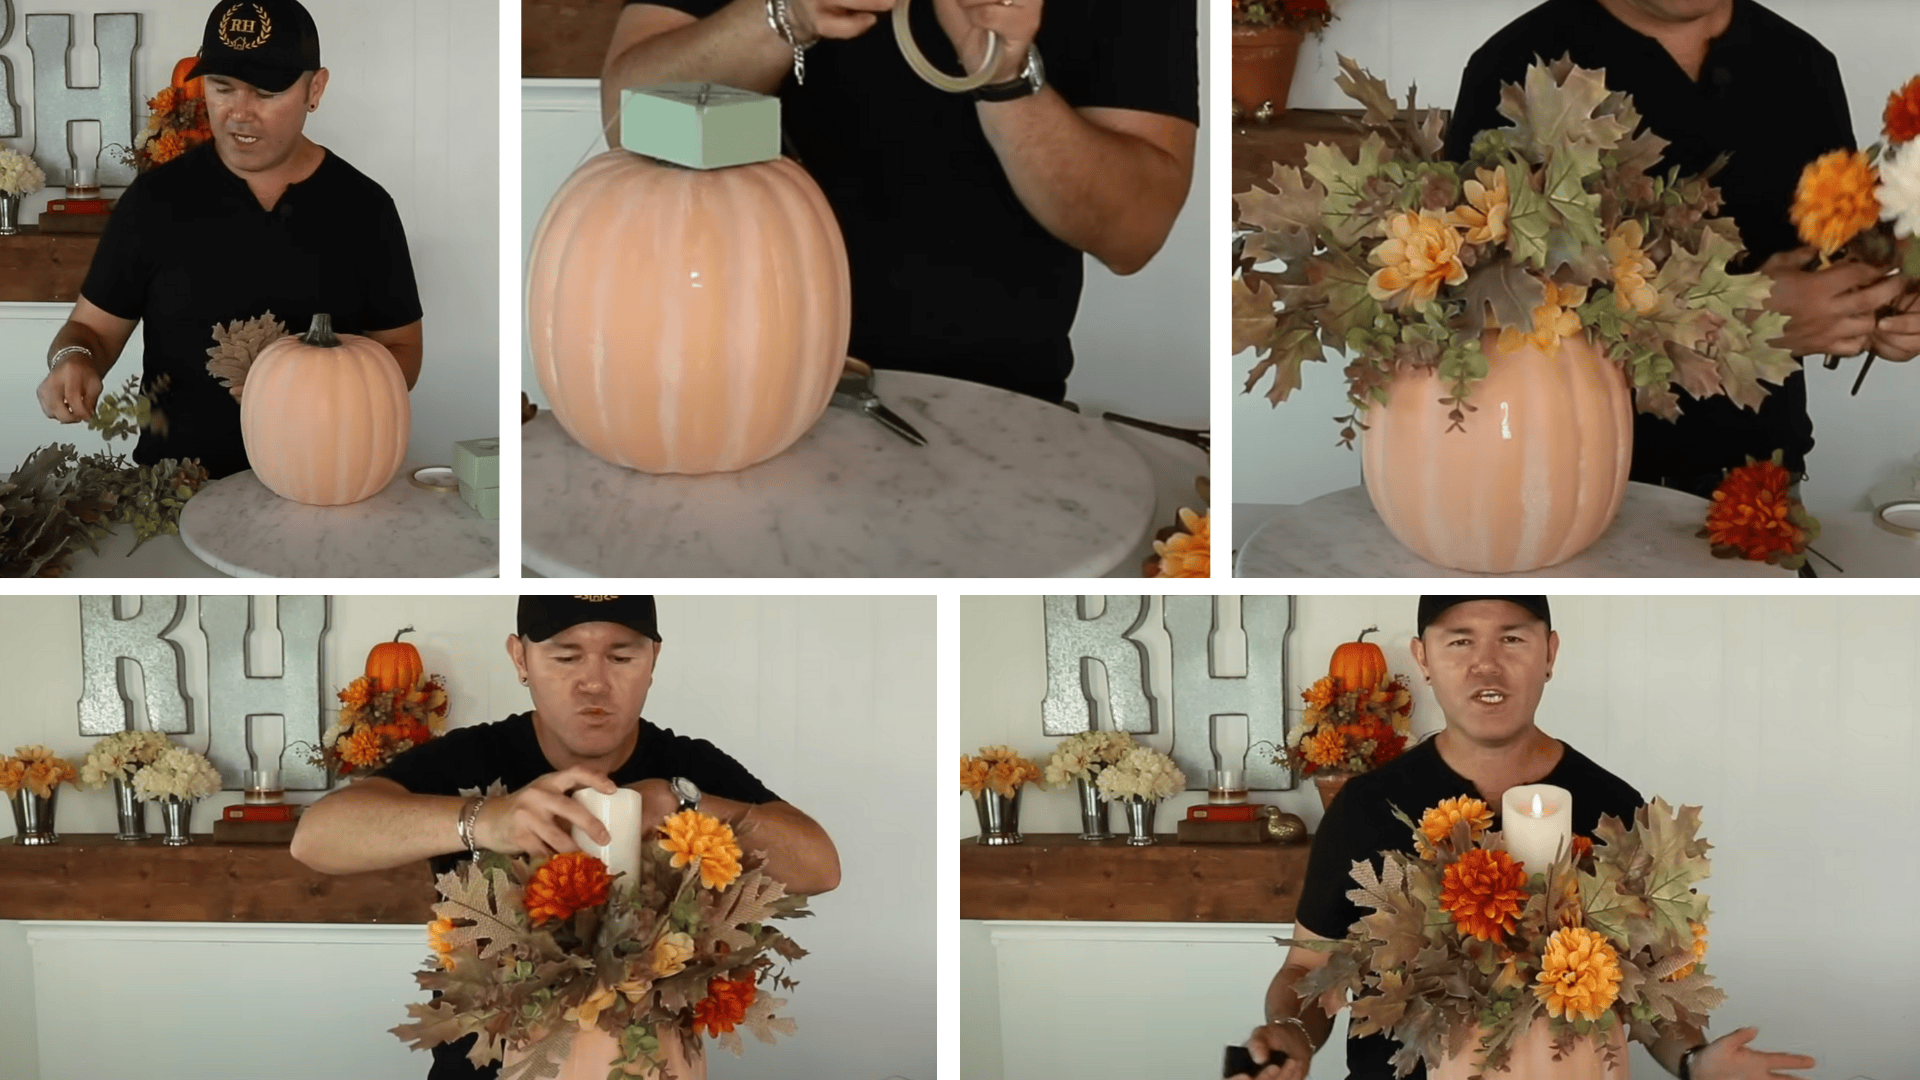
For a simple, stylish option, try this easy pumpkin centerpiece. It’s perfect for smaller tables or anyone who loves clean, minimal decor. You’ll spend less time but still get great results.
Step 1: Prepare the Pumpkin. Use floral tape to attach foam to the top of the pumpkin. This becomes your base for flowers and greenery.
Step 2: Insert Cascading Foliage. Add cascading greenery around the foam. Use sage, brown, or oak foliage for a fall-inspired flow.
Step 3: Add Mums and Small Pumpkins. Insert terracotta-colored mums and small decorative pumpkins into the foam. Keep things balanced and symmetrical.
Step 4: Final Touches Add extra foliage or filler flowers for more texture. Adjust until it looks full and complete.
Video Tutorial
Special thanks to Ramon at HOME for providing valuable insights in their video, which I referenced while creating this guide.
16 Additional Thanksgiving Centerpiece Ideas
Not sure which centerpiece fits your style? Here are 16 more ideas to get your creative juices flowing. Each one brings something different to your Thanksgiving table.
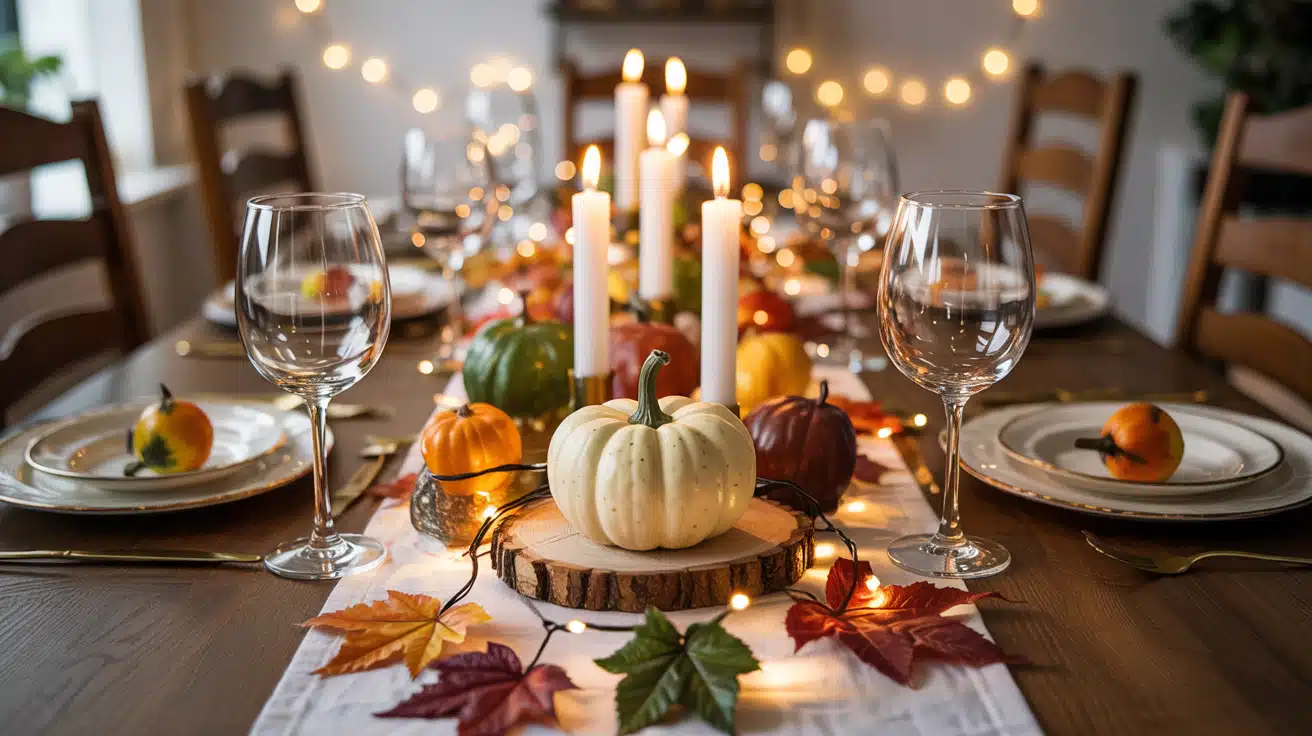
1. Mini Pumpkin and Candle Centerpieces
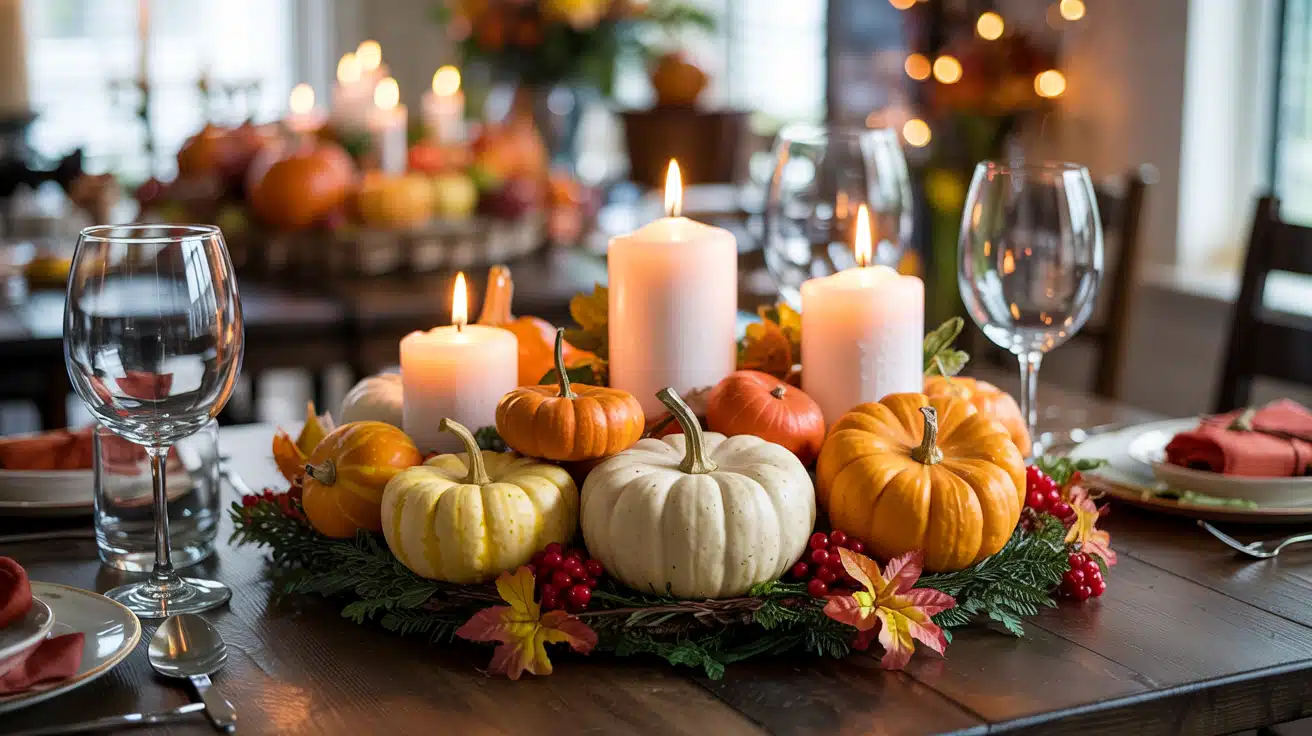
Arrange small pumpkins around pillar candles for a simple, cozy look. The warm candlelight makes the pumpkins glow beautifully. This works perfectly for intimate dinners or smaller tables.
2. Rustic Wooden Tray with Fall Florals
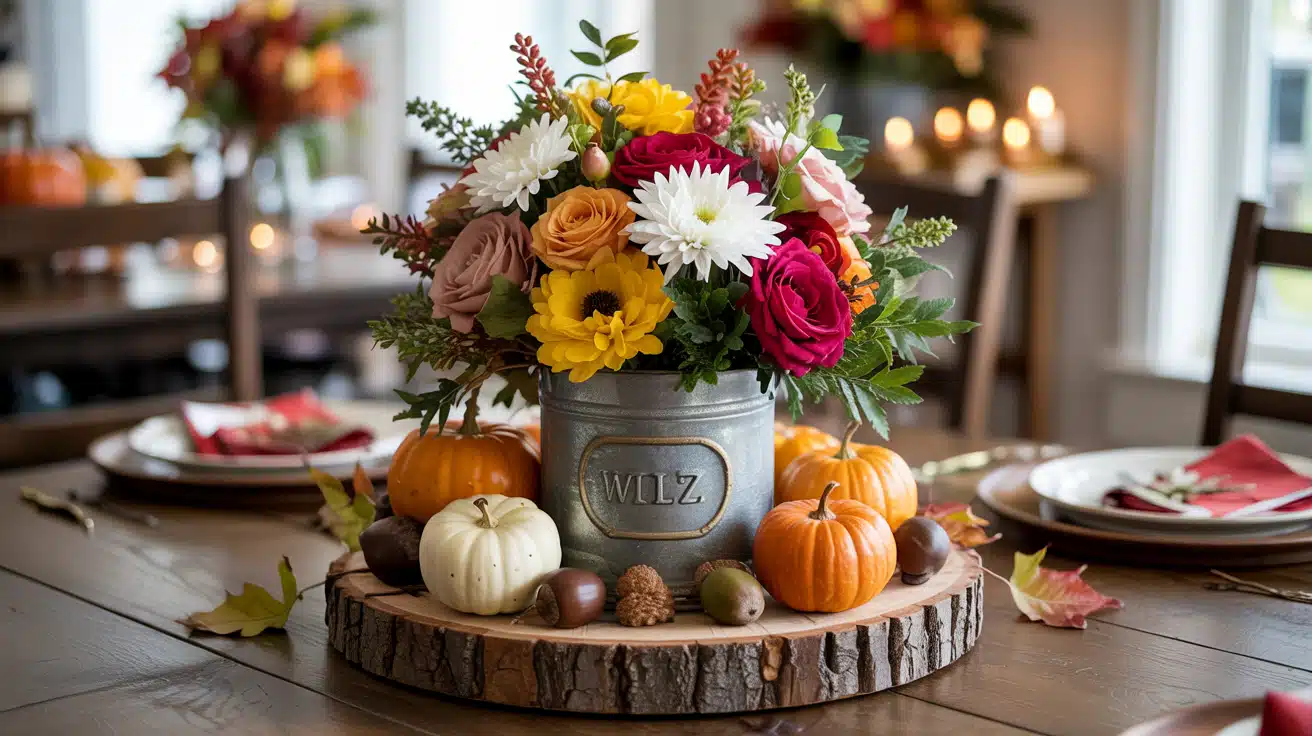
Place fall flowers and greenery on a wooden tray for a farmhouse feel. Add small decorative items, such as acorns or berries, for extra charm. The wood base keeps everything organized and easy to move.
3. Cornucopia with Seasonal Fruits and Flowers
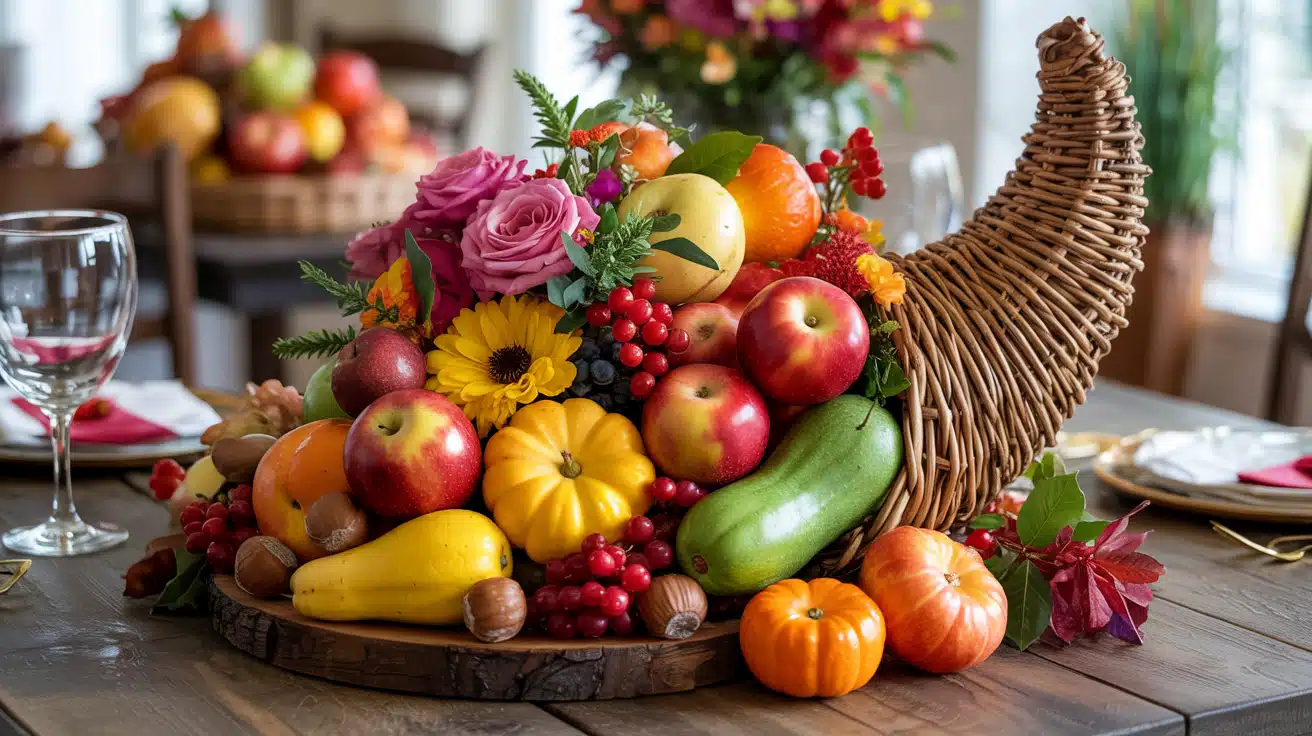
Fill a cornucopia basket with fresh fruits, nuts, and fall blooms. This traditional symbol of abundance fits perfectly with Thanksgiving themes. It brings both color and meaning to your table.
4. Metallic Pumpkins and Eucalyptus
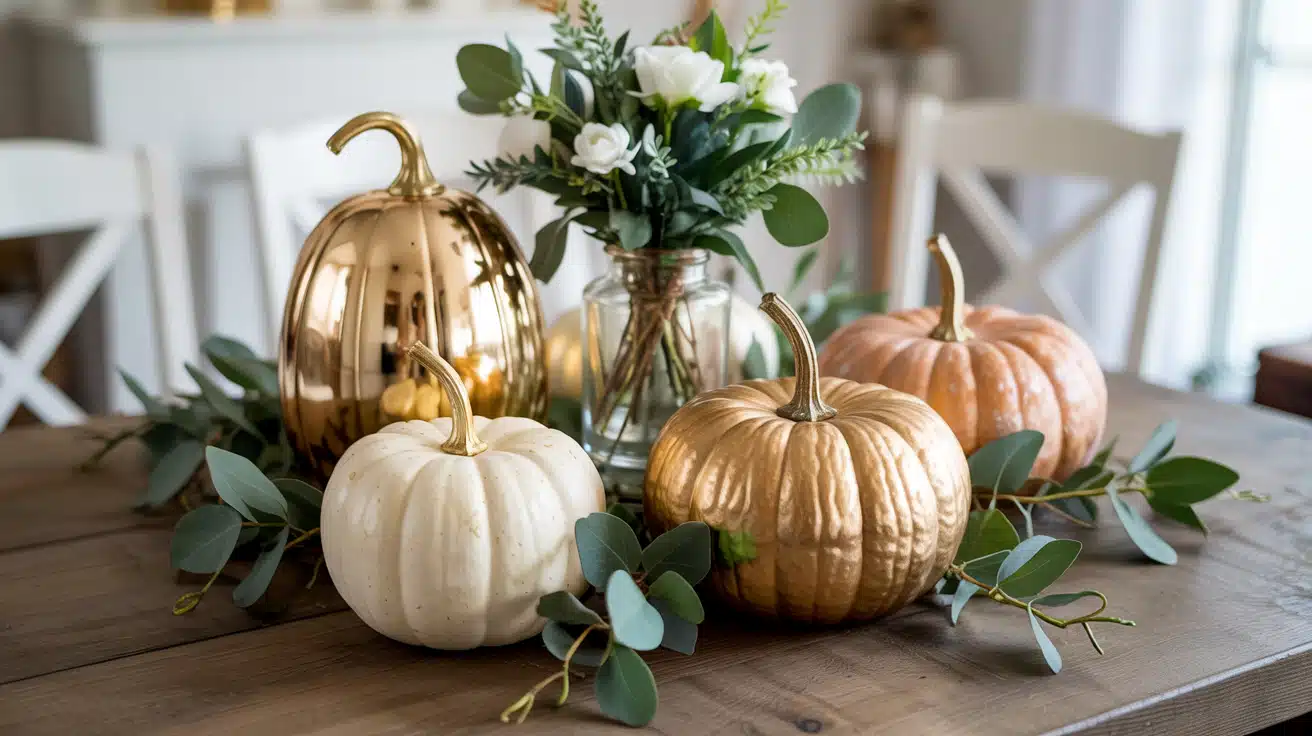
Pair gold- or copper-painted pumpkins with fresh eucalyptus stems. The metallic shine adds a modern, glamorous touch. Eucalyptus brings a fresh scent and soft texture.
5. Mason Jar Filled with Autumn Leaves and Twigs
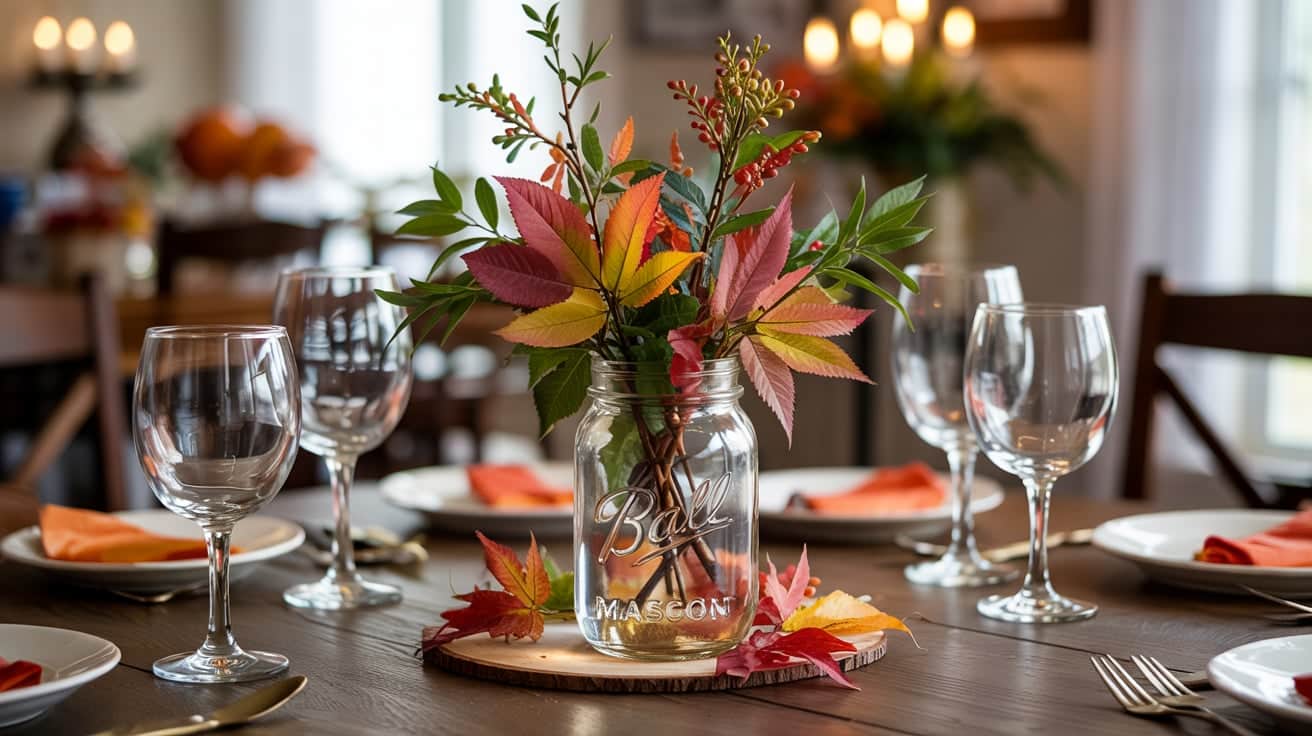
Gather colorful fall leaves and branches in clear mason jars. This simple arrangement costs almost nothing to make. It brings the outdoors inside in the most natural way.
6. DIY Leaf Garland with LED Lights
String artificial fall leaves along LED fairy lights for a glowing centerpiece. Drape it down the center of your table for a magical effect. The lights add warmth without open flames.
7. Gold Accented Centerpiece with Sunflowers
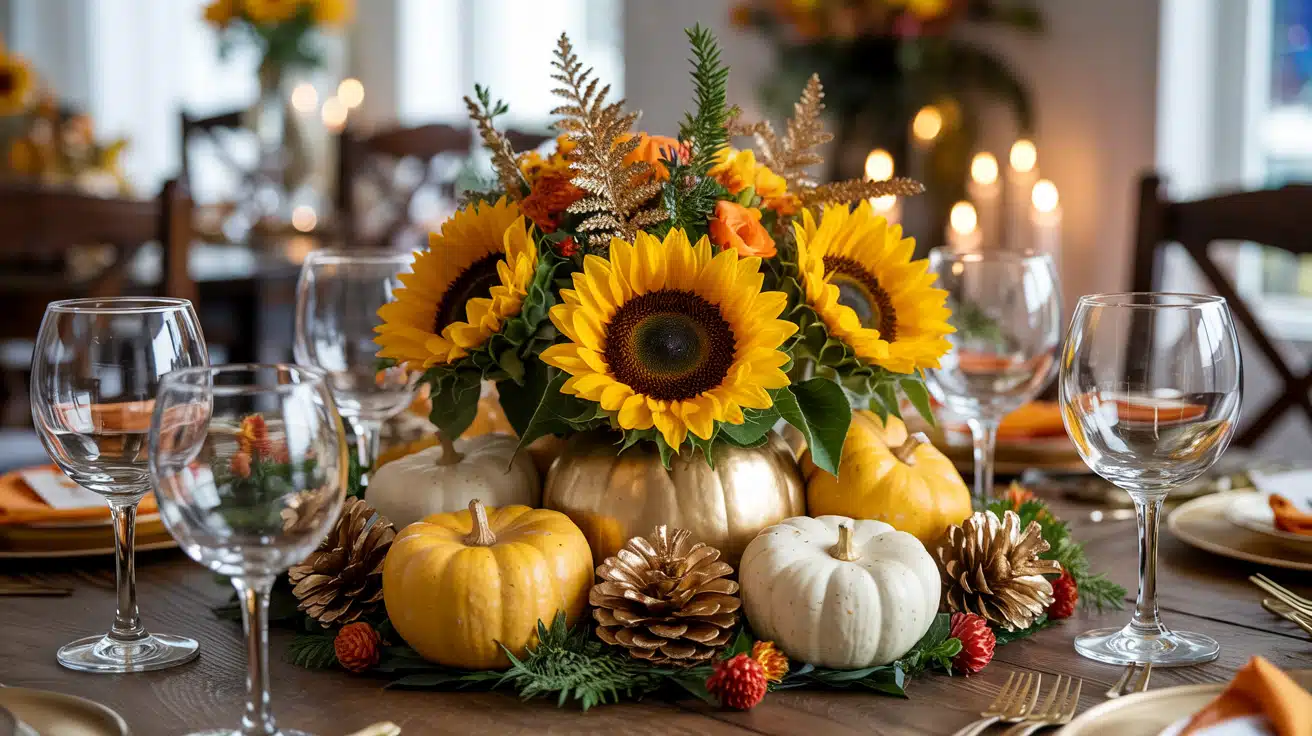
Combine bright sunflowers with gold-painted accents, such as pinecones or small pumpkins. The contrast between yellow and gold feels rich and festive. This style works well for formal gatherings.
8. Seasonal Fruit Basket as the Focal Point
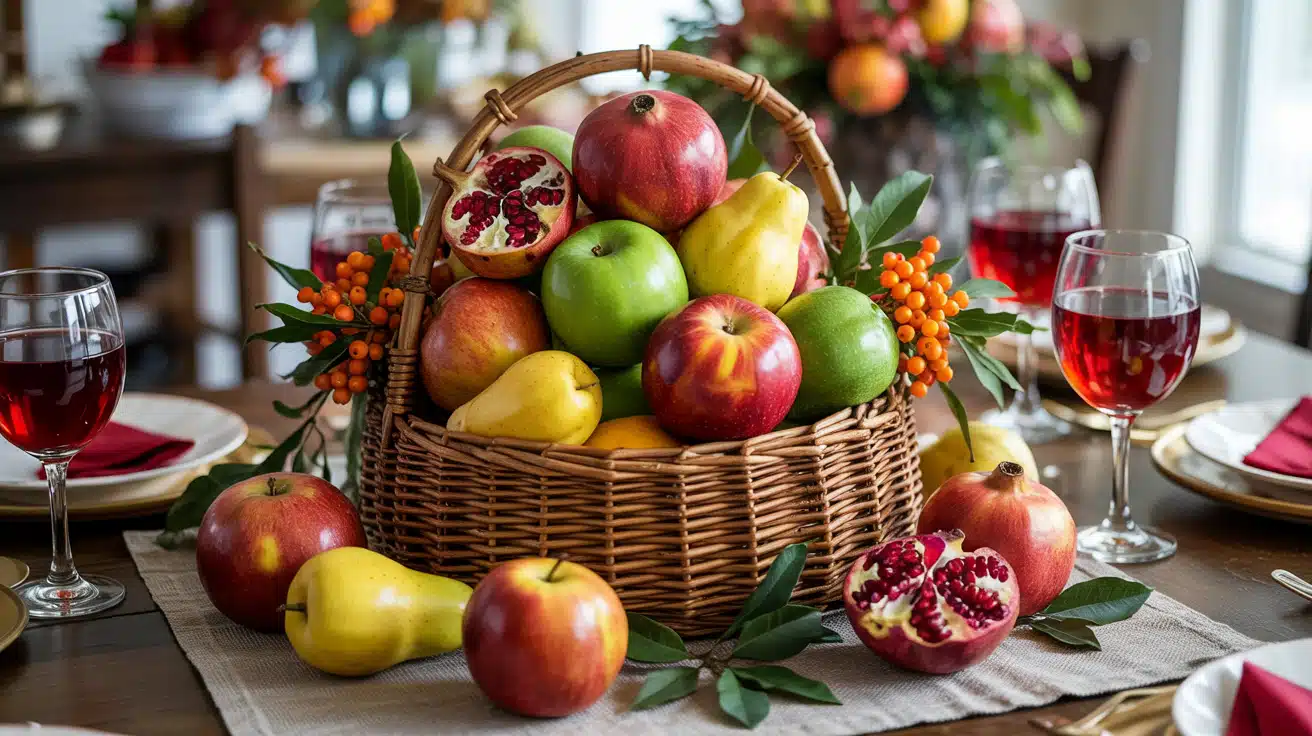
Pile fresh apples, pears, and pomegranates in a decorative basket. Edible centerpieces look beautiful and serve a purpose after dinner. Guests can enjoy the fruit as dessert or take pieces home.
9. Candles Surrounded by Fall Leaves and Pinecones
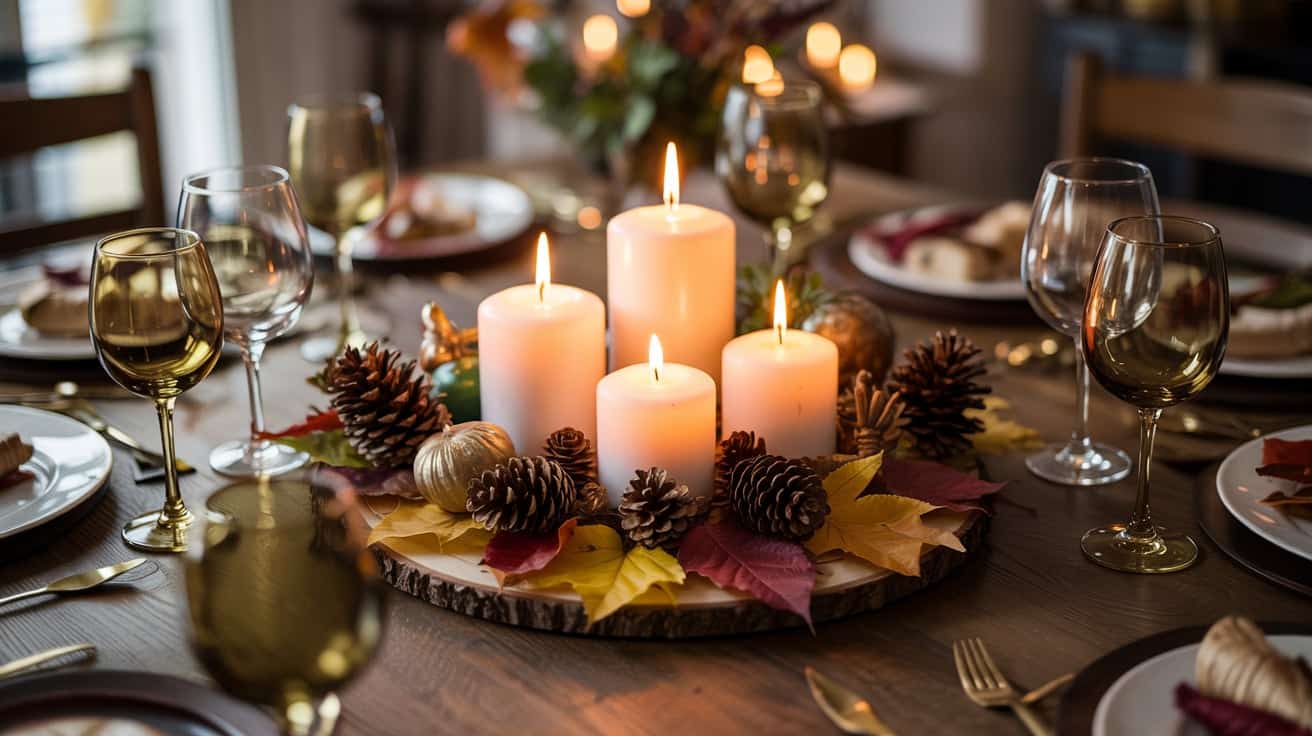
Circle candles with a ring of dried leaves and pinecones. This creates a warm, natural glow perfect for evening dinners. The earthy materials make the space feel cozy and welcoming.
10. A Simple Bowl of Decorative Gourds and Acorns
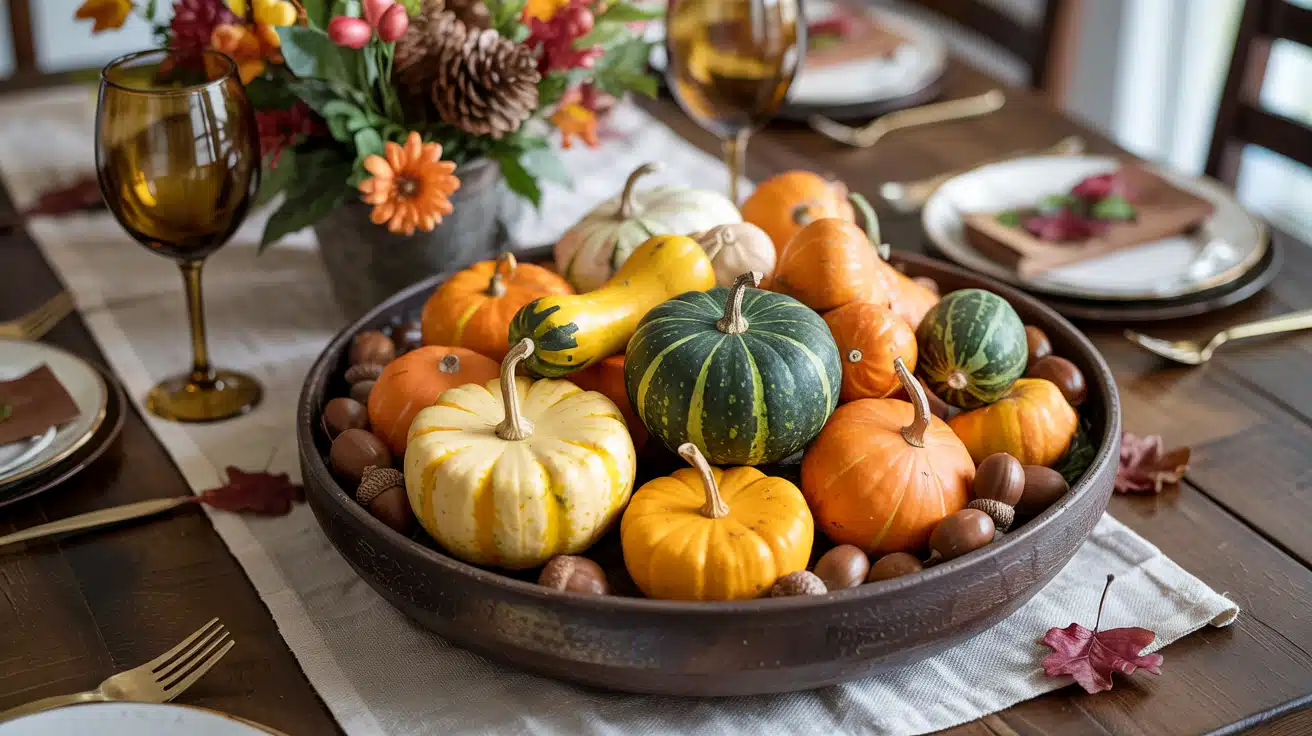
Fill a wide bowl with colorful gourds, acorns, and mini pumpkins. This no-fuss option takes minutes to put together. The mix of shapes and colors creates visual interest without effort.
11. Wheat Sheaf Centerpiece for a Farmhouse Look
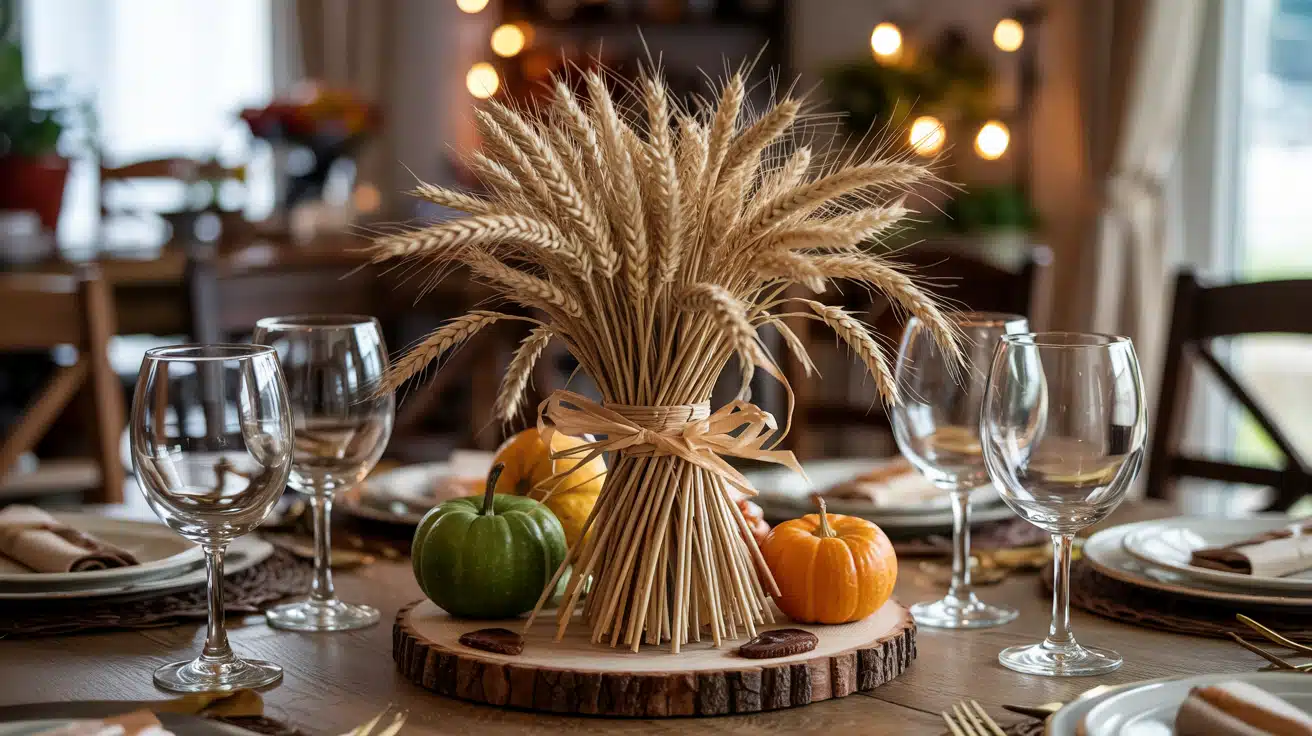
Bundle dried wheat stalks together and tie them with twine or ribbon. This classic harvest symbol brings authentic country charm. It pairs beautifully with rustic table settings.
12. Mixed Metal Accents with Fall Florals
Combine copper, bronze, and gold containers filled with fall flowers. The varied metals add depth and shine to your table. Mix in greenery to soften the metallic look.
13. Apple Orchard Inspired Centerpiece
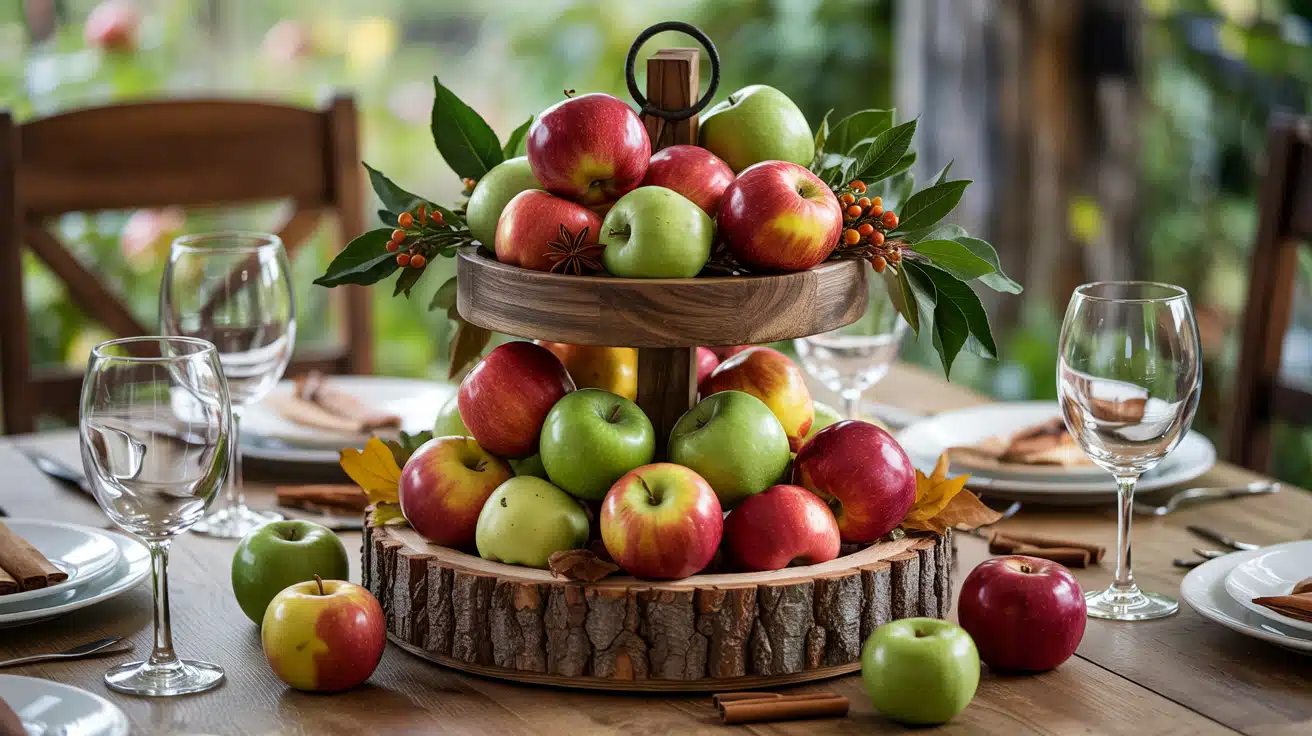
Stack fresh red and green apples in a tiered stand or wooden crate. Add cinnamon sticks and star anise for a sweet fall scent. This brings the feeling of an apple orchard right to your table.
14. Floating Candles with Autumn Foliage in Water
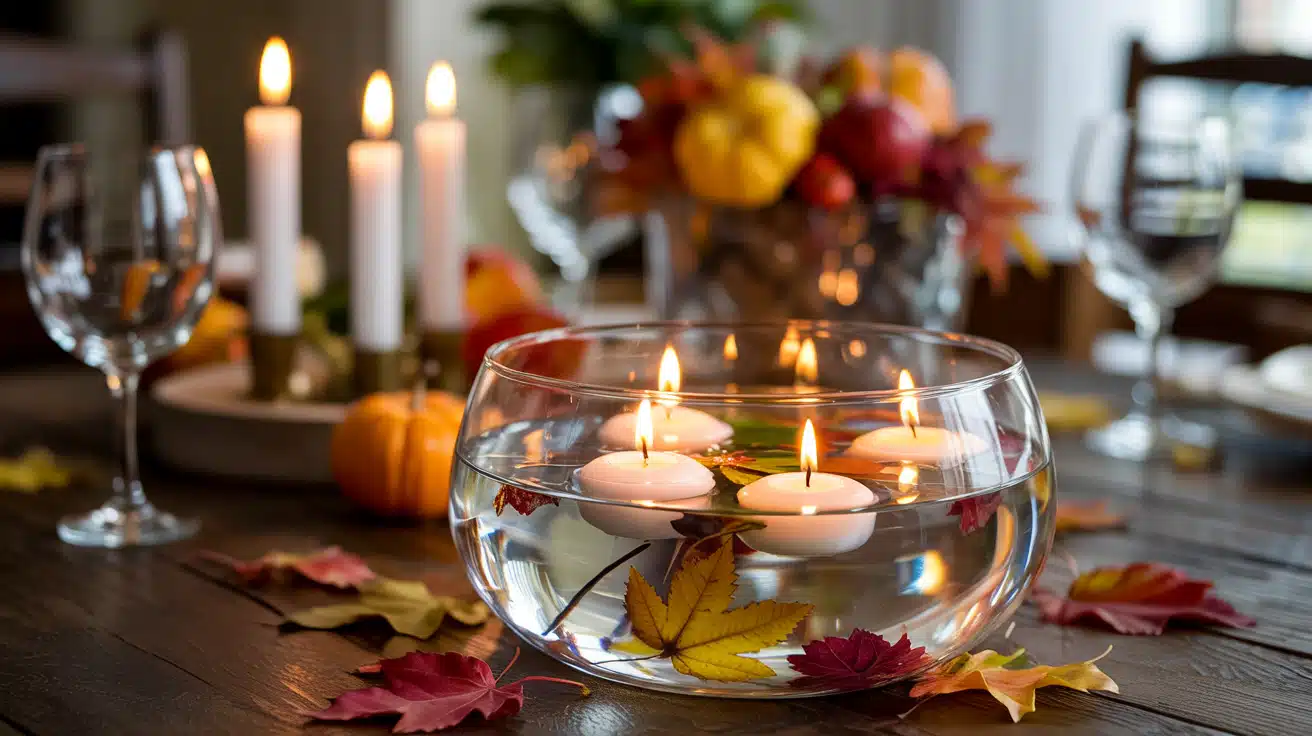
Place floating candles in a shallow glass bowl filled with water and fall leaves. The reflection creates a peaceful, calming effect. This works especially well for evening celebrations.
15. Fall Themed Mason Jar Centerpieces with Twine
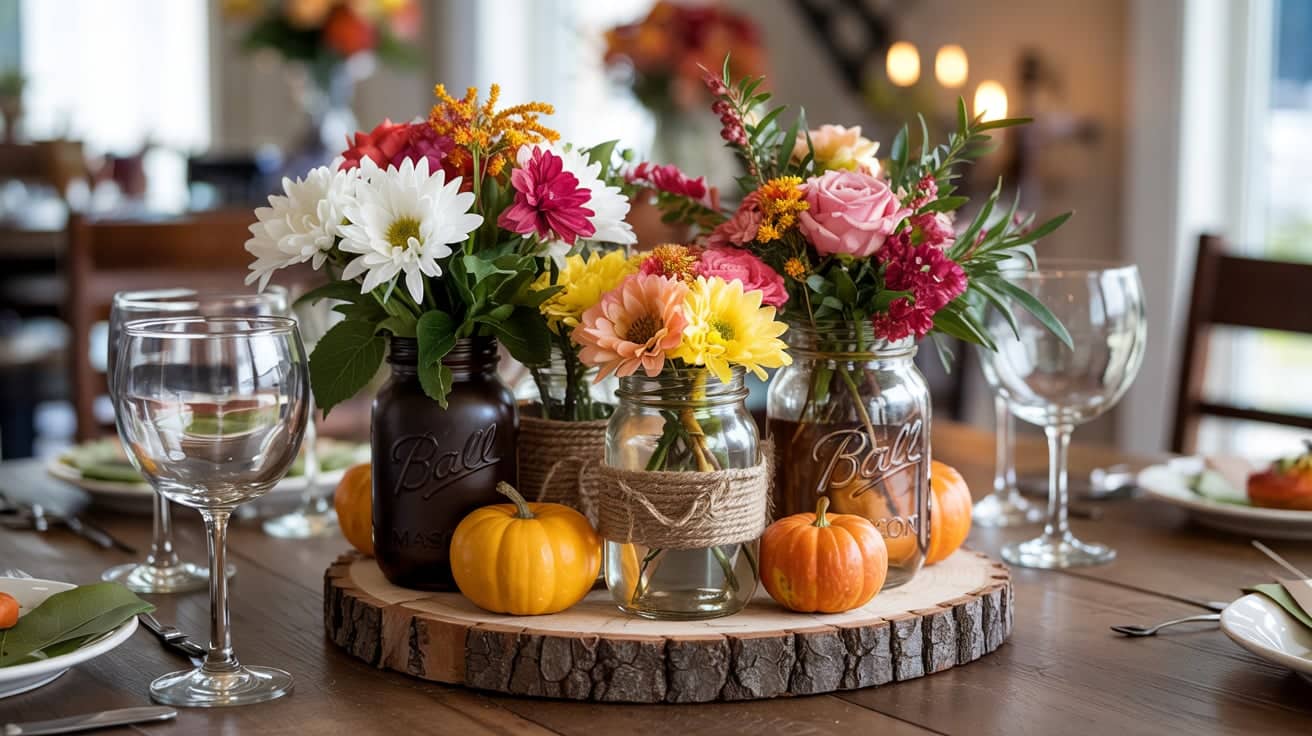
Wrap mason jars with twine and fill them with seasonal flowers or branches. Group several jars together for a fuller look. This budget-friendly option feels homey and personal.
16. DIY Floral Arrangement with Dried Flowers
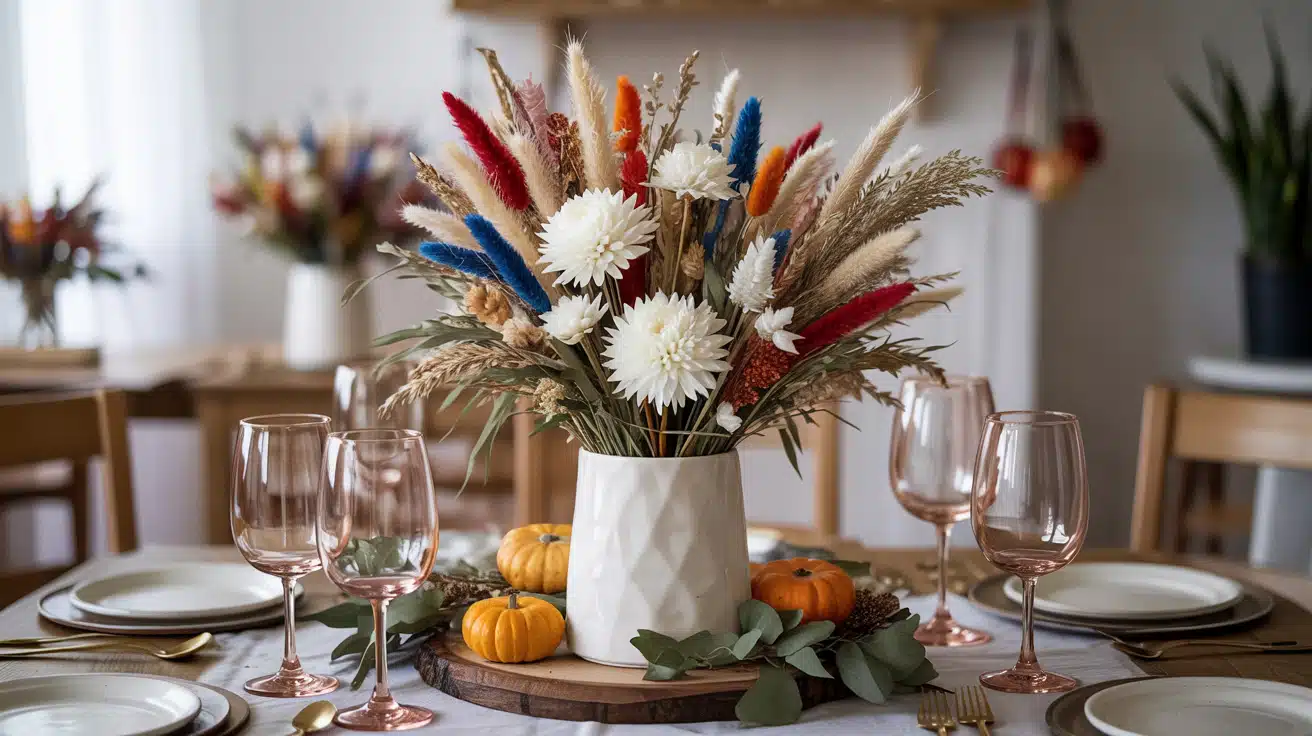
Use dried flowers like wheat, pampas grass, and preserved blooms in a vase. Dried arrangements last for weeks without water or maintenance. They bring a soft, vintage feel to your table.
Tips for a Perfect Thanksgiving Centerpiece
Creating a beautiful centerpiece takes more than just following steps. These expert tips will help your arrangement look polished and professional.
- Use Odd Numbers: Group items in sets of 3, 5, or 7 for a naturally balanced, pleasing look.
- Layer for Depth: Mix different heights and textures together to add dimension and keep eyes moving across your design.
- Consider Your Table Theme: Match your centerpiece colors and style to your table setting so everything flows together.
- Add a Personal Touch: Include family heirlooms, handwritten place cards, or items that reflect your own traditions.
- Keep It Functional: Make sure your centerpiece leaves enough room for plates and serving dishes, and that guests can see each other.
Wrapping It Up
DIY Thanksgiving centerpieces are a wonderful way to add your personal touch to holiday decor.
You can choose a natural pumpkin centerpiece, a traditional garland arrangement, or a simple pumpkin design. Each one creates a beautiful focal point for your Thanksgiving table.
By using affordable materials and customizing the design, you’ll make a one-of-a-kind centerpiece that shows your unique style and personality.
So gather your supplies, get creative, and start crafting today. Your Thanksgiving table will be the talk of the holiday.
Which centerpiece will you try first? Share your creations with us in the comments below!