
Ready to decorate your home for Christmas, but not sure where to start? You’re in the right place.
Decorating for the holidays doesn’t have to be complicated or expensive. In this step-by-step guide, I’ll walk you through exactly how to style four key areas of your home: the breakfast nook, kitchen countertop, entryway, and console table.
You’ll learn what materials you need, how to arrange them, and simple styling tricks that make everything look polished.
These steps are beginner-friendly, budget-conscious, and perfect for creating a warm, classic Christmas feel. Let’s get started and make your home festive without the stress or overspending
How to Choose Your Christmas Decorating Style?
Before you start hanging garlands or filling bowls with ornaments, take a moment to choose a simple decorating strategy. Pick one accent color like burgundy or gold and use it in every room.
Stick to one metal finish, brass, copper, or silver, so nothing feels mixed up. Use the same type of greenery throughout your home, such as cedar or pine, to create a sense of flow.
Then layer in texture with wood, ribbon, candles, and pottery. These small choices make a big difference. Your home will look polished and put-together without feeling overdone or confusing.
Here’s the table formatted for your blog:
How to Decorate for Christmas: Step-by-Step Instructions
Now that you have your style strategy in place, it’s time to start decorating. Follow these simple steps to style four key areas of your home with ease.
Tools & Materials You’ll Need
| Area | Supplies |
|---|---|
| Breakfast Nook | Floor-length tablecloth, scrap fabric, wreath, brass candlesticks, taper candles |
| Kitchen Countertop | Crock, wooden utensils, mini tree, rustic pot, breadboards, berry/juniper picks, ribbon, handmade figurine, cookie jar, riser, copper kettle |
| Entryway Garland | Tension rod, lightweight garlands, fillable ornaments, gold spray paint, brown paint wash, ribbon, greenery picks, bells, pinecones |
| Console Table | Cedar garland, wooden bowl, inkwell vase, pine stems, ornaments, pinecones, ribbon, brass candle |
This organized list makes shopping and prep easy. You don’t need everything at once, just gather what you need for each area as you go.
Step 1: Style a Christmas Breakfast Nook Tablescape

This is where your holiday gatherings begin. A simple tablescape sets the tone for cozy mornings and festive dinners. You don’t need much, just a few layers and some candlelight to make it feel special.
Materials: Floor-length tablecloth, burgundy scrap fabric, berry wreath, brass candlestick holders, twisted taper candles
How to Do It:
- Lay the tablecloth over your table to soften the space instantly.
- Scrunch burgundy fabric into a loose, wavy runner down the center.
- Place the berry wreath flat in the middle as your centerpiece base.
- Add brass candlesticks inside and around the wreath, then insert twisted taper candles.
- Adjust everything so there’s still room for plates and serving dishes.
Step 2: Create a Cozy Christmas Kitchen Countertop Vignette
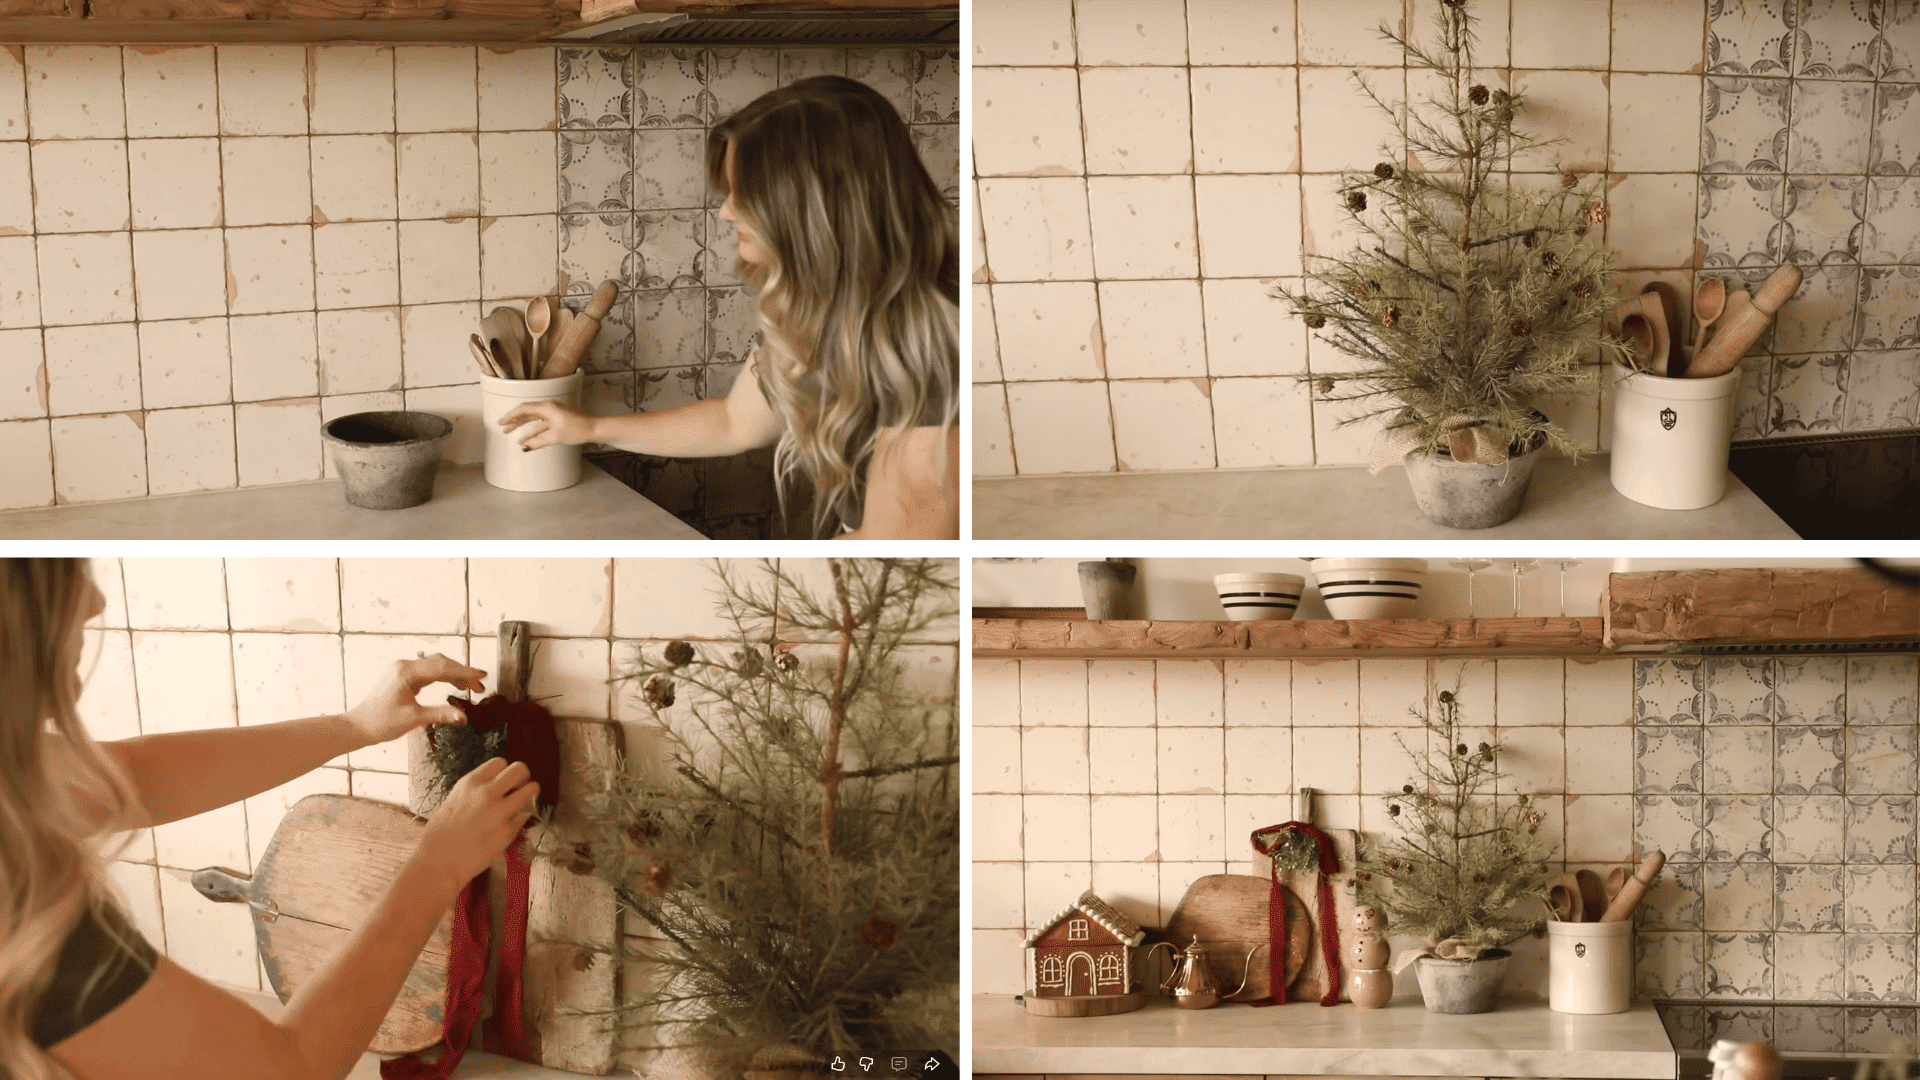
Your kitchen is the heart of the home during the holidays. A small vignette on your countertop keeps things festive without taking up too much space. This setup stays functional while adding warmth and personality to the room.
Materials: Vintage crock, wooden utensils, small rustic pine tree, clay pot, breadboards, ribbon, berry/juniper picks, ceramic snowman, gingerbread cookie jar, riser, copper kettle
How to Do It:
- Clear one section of your countertop and place the crock in the corner filled with wooden utensils.
- Add a small pine tree in a rustic pot for height and charm.
- Lean breadboards against the backsplash and tie frayed ribbon around one handle with a juniper pick.
- Add the snowman figurine and place the cookie jar on a riser for intentional styling.
- Finish with a thrifted copper kettle for a pop of shine and warmth.
Step 3: Create a Garland & Ornament Entryway Feature

This is the statement piece your entryway needs. It’s simple to install and creates a wow factor without drilling holes or damaging walls. The hanging ornaments add dimension and a touch of vintage charm.
Materials: Tension rod, lightweight pine garland, clear fillable ornaments, gold spray paint, brown paint wash, burgundy ribbon, evergreen picks, brass bell picks, pinecones
How to Do It:
- Install a tension rod across your entryway opening.
- Spray paint clear ornaments gold and add a brown wash to the tops for a vintage look.
- Fill each ornament with greenery, bells, or pinecones.
- Hang them from the rod using burgundy ribbon at staggered lengths for dimension.
- Wrap lightweight garland around the rod and fluff until it looks full and natural.
Step 4: Decorate the Console Table with Layered Greenery

The console table is one of the easiest spots to style for Christmas. You don’t have to start from scratch, just layer greenery and accents over what’s already there. This approach saves time and keeps your space functional.
Materials: Real Touch cedar garland, wooden bowl, inkwell vase, pine stems, Norfolk pine stems, ornaments, pinecones, ribbon, berry picks, brass bell candle
How to Do It:
- Leave staple pieces like your lamp and bowl in place to keep styling simple.
- Drape cedar garland along the console and let it fall softly off the sides.
- Add the inkwell vase inside the wooden bowl and insert short pine stems for height.
- Fill the bowl with a mix of ornaments and pinecones, then tie a small ribbon bow around your lamp with a berry pick.
- Add Norfolk pine stems to a vase and finish with a brass bell candle for aged metallic warmth.
Video Tutorial
Special thanks to Jenna Pierce for providing valuable insights in their video, which I referenced while creating this guide.
Budget-Friendly Christmas Styling Tricks
You don’t need to spend a lot to make your home feel festive. Smart shopping and reusing what you already have go a long way. Here are a few simple ways to save money while still getting a polished, high-end look.
- Thrift first: Look for brass candlesticks, wooden bowls, breadboards, and pottery at thrift stores before buying new.
- Reuse scrap fabric: Turn leftover fabric into table runners, bows, or filler pieces, rather than buying decor.
- Invest in quality greenery: Buy a few real-touch greenery pieces that last for years, rather than replacing cheap ones every season.
- Stick to one metal and color: Choose one metal tone and one accent color throughout your home for a cohesive, expensive look.
- Add ribbon or greenery to everyday items: Tie a bow or tuck in a sprig of pine to make regular items feel festive.
- Keep kitchen decor functional: Style your countertop so it still leaves space for cooking and meal prep.
Finishing Touches That Make Your Home Feel Complete
Once the main areas are styled, small finishing touches bring everything together. Tie soft ribbon bows on lamps, crocks, vases, and door handles for a cohesive feel.
Tuck greenery stems into bathrooms, bedrooms, and open shelves to carry the holiday vibe through every room. Use warm lighting, such as LED tapers or fairy lights, to create a cozy glow.
Repeat your chosen metal tone, brass, gold, or copper, in each space so nothing feels out of place. Add soft textures like knit throws, faux fur, or velvet ribbons to make your home feel inviting and complete.
Wrapping It Up
Decorating for Christmas is all about creating warmth, comfort, and joy in your home.
By styling just a few key areas and layering simple touches like greenery, ribbon, brass accents, and natural textures, you can make your space feel festive without spending much or feeling overwhelmed.
This approach gives you a beautifully decorated home that’s easy to maintain and filled with meaningful little moments.
Start with one area today and build from there; you’ll be surprised how quickly it all comes together.
What’s your favorite Christmas decorating tip? Share it in the comments below, and don’t forget to save this guide for next year!