
Want to create your own miniature garden but don’t know where to start? Building a terrarium might seem complicated, but it’s actually simpler than you think.
These glass-enclosed gardens are ideal for beginners and bring a touch of natural beauty to any space.
Whether you want a desktop display or a living centerpiece, terrariums offer endless creative possibilities.
They’re also incredibly rewarding. Watching your mini-ecosystem thrive gives you a genuine sense of accomplishment. Plus, they make wonderful gifts and conversation starters.
In this blog, I’ll guide you step-by-step through building your first terrarium and share some care tips and common mistakes that will inspire your next project.
What Makes Terrariums So Special?
Terrariums are self-contained ecosystems that require minimal care once established. They work by creating their own water cycle inside the glass container.
Water evaporates from the soil and plants, condenses on the glass walls, and drips back down to the roots.
This process makes terrariums perfect for:
- Busy lifestyles – water only when needed
- Small spaces – fit anywhere from desks to shelves
- Low-light areas – many plants thrive in indirect light
- Learning tool – great for kids to understand plant growth
Step-by-Step Terrarium Building Guide
Now that you understand the basics, let’s walk through building your first terrarium from start to finish.
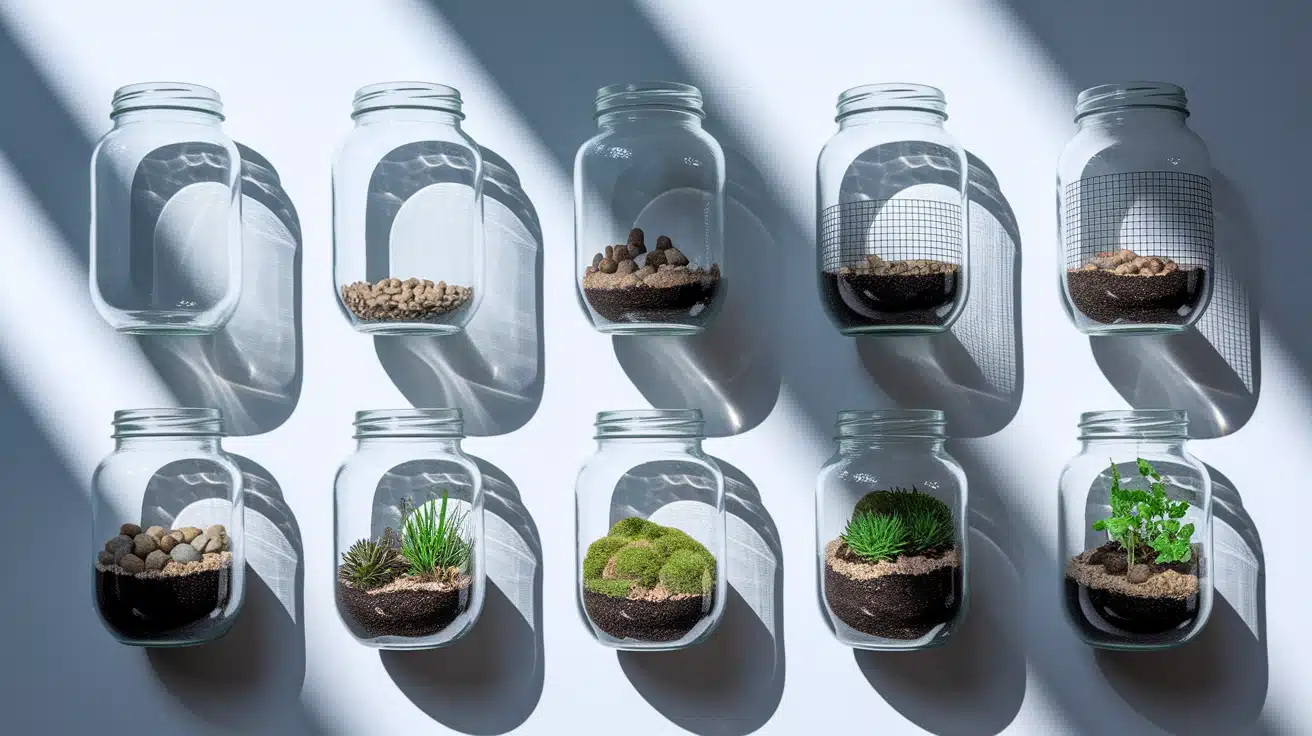
Step 1: Choose Your Container
Begin by selecting the container that best suits your skill level. While narrow-neck bottles look beautiful, they’re much harder to work with and require special, long tweezers.
The container you choose will determine how easy your build process will be and how much maintenance your terrarium needs.
Always position glass seams on the sides to avoid blocking your view, and ensure your container has a tight-fitting lid for closed terrarium systems.
| Container Type | Difficulty | Best For |
|---|---|---|
| Glass cookie jar with lid | Beginner | First-time builders |
| Wide-mouth mason jar | Easy | Budget-friendly projects |
| Glass spice jar | Easy | Mini desktop displays |
| Drinking glass | Easy | Open terrarium designs |
| Narrow glass bottles | Advanced | Experienced builders |
Pro tip: Look for containers around 2 liters in size with tight-sealing lids for closed terrariums.
Step 2: Create the Drainage Layer
This bottom layer prevents water from sitting around plant roots and causing rot. Without proper drainage, excess water has nowhere to go, leading to soggy soil and unhealthy plants.
The drainage layer acts like a reservoir, storing excess water away from plant roots while still keeping it available for the terrarium’s water cycle. This step is absolutely critical for long-term terrarium success.
| Material | Size | Benefits |
|---|---|---|
| Pea gravel | Small stones | Affordable, widely available |
| Leca balls | Lightweight clay | Porous, holds extra water |
| Small river rocks | Various sizes | Natural look, good drainage |
| Aquarium gravel | Uniform pieces | Clean appearance, consistent |
Depth needed: About 2-3 centimeters of depth for your container size
Pour your chosen drainage material into the bottom of your container. Leca balls work exceptionally well because they’re lightweight and porous, holding extra water for later use.
Step 3: Add Substrate Barrier
This mesh layer stops soil from falling into your drainage layer.
Without this barrier, your carefully created drainage system becomes useless as soil clogs all the spaces between your drainage materials.
The barrier allows water to flow through while keeping soil particles in place. It’s a simple addition that makes a huge difference in your terrarium’s long-term health and appearance.
| Material | Cost | Effectiveness |
|---|---|---|
| Window screen mesh | Low | Excellent |
| Weed blocker fabric | Medium | Good |
| Coffee filter | Very low | Fair |
Cut the mesh slightly larger than the opening of your container. It doesn’t need to be perfect; a little overlap actually helps prevent soil from sneaking through the edges.
Step 4: Mix Your Growing Medium
Create the perfect soil blend for terrarium plants using this proven recipe. Regular potting soil is too dense for terrariums and doesn’t provide the drainage and aeration that these plants need.
This special mix has been tested in over 2,000 successful terrariums, providing the perfect balance of moisture retention, drainage, and nutrients. Each ingredient plays a specific role in creating the ideal growing environment.
| Ingredient | Parts | Purpose |
|---|---|---|
| Coco fiber (hydrated) | 1 part | Moisture retention |
| Sphagnum moss | 2 parts | Aeration and drainage |
| Orchid bark | 1/4 part | Prevents compaction |
| Activated charcoal | 1/4 part | Odor control |
| Worm castings | 1/4 part | Slow-release nutrients |
Mixing instructions:
- Soak the coconut fiber brick in water for 20 minutes until fully expanded
- Trim sphagnum moss into small pieces with scissors
- Combine all ingredients in a large tub and mix thoroughly
- Add 3-4 inches of this mixture to your terrarium, creating a slight slope toward the back
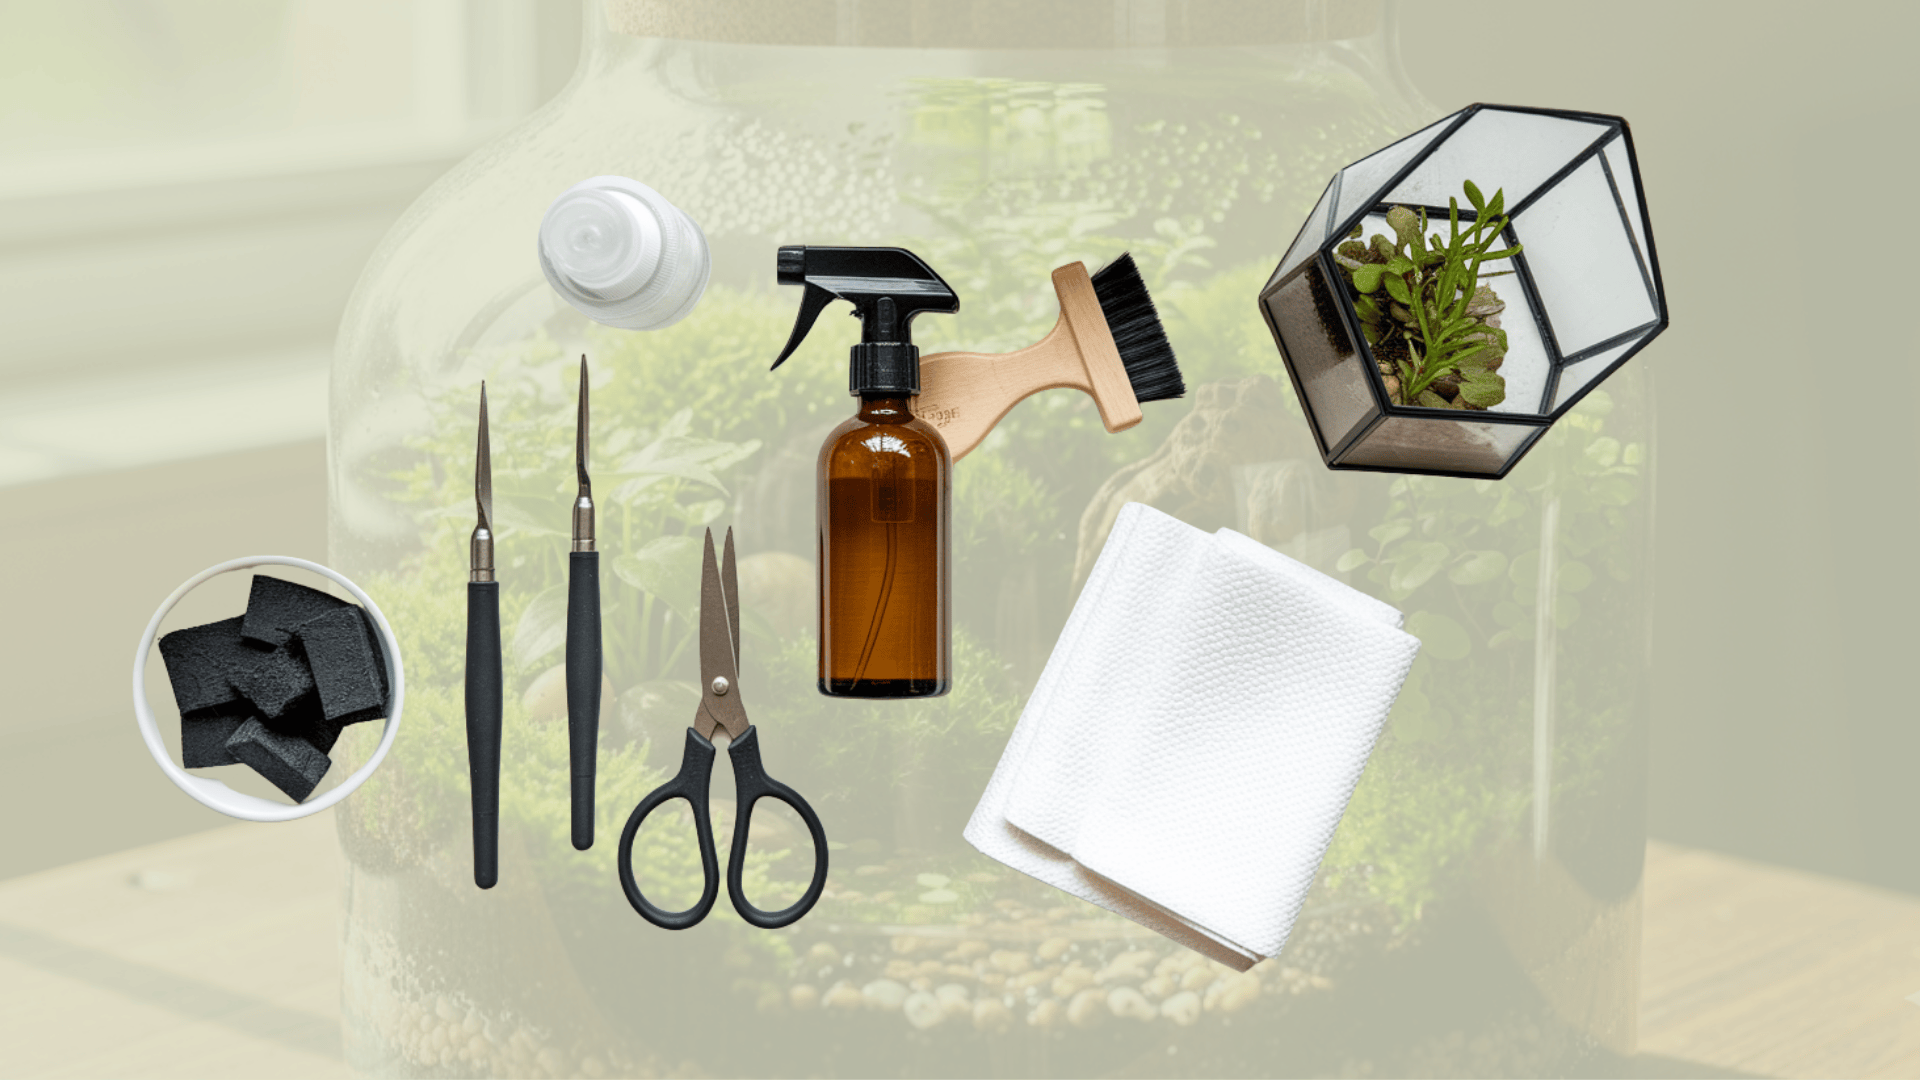
Step 5: Design Your Hardscape
Add rocks, wood, or decorative elements before planting. This step changes your terrarium from a simple planter into a miniature landscape that tells a story.
Take your time experimenting with different arrangements; the hardscape creates the foundation for your entire design.
Consider how elements will look from different angles and how plants will grow around them over time.
| Material | Appearance | Cost | Best Use |
|---|---|---|---|
| Dragonstone | Textured, natural | Medium | Focal points |
| Slate stone | Horizontal lines | Low | Layered looks |
| Spiderwood | Branching shapes | Medium | Tree-like features |
| Cork bark | Rustic texture | Low | Background elements |
| Lava rock | Porous, dramatic | Low | Volcanic themes |
Experiment with different layouts before settling on your final design. Three pieces of stone, often accompanied by one piece of wood, create a balanced, natural look.
Step 6: Select and Prepare Your Moss
Choose moss that thrives in terrarium conditions. Moss is often the star of any terrarium, creating that lush, forest-floor appearance that makes these mini gardens so appealing.
Different moss species exhibit distinct growth patterns and light requirements, making it crucial to select the right type for your setup.
Proper preparation ensures that your moss establishes quickly and covers the terrarium landscape evenly.
| Moss Type | Growth Speed | Light Needs | Best For |
|---|---|---|---|
| Cushion moss | Slow | Low to medium | Low maintenance |
| Fern moss | Medium | Medium | Forest-like appearance |
| Mood moss | Fast | Medium | Quick coverage |
Preparation steps:
- Remove any sticks, leaves, or debris from the moss
- Tear into smaller, manageable pieces
- Trim the brown base with scissors (save these pieces for future substrate mix)
- Press gently onto the soil surface to ensure good contact
Step 7: Add Your Plants
Select plants that enjoy humid, low-light conditions. The key to successful terrarium plants is choosing species that naturally thrive in the high humidity and lower light conditions found inside glass containers.
These plants should stay relatively small and grow slowly to avoid outgrowing their space too quickly.
| Plant | Features | Care Level | Growth Rate |
|---|---|---|---|
| Fittonia | Colorful nerve patterns | Easy | Slow |
| Small peperomia | Thick, water-storing leaves | Easy | Very slow |
| Hydrocotyle | Small round leaves | Easy | Fast |
| Baby ferns | Delicate fronds | Medium | Medium |
| Small begonias | Flowers and color | Medium | Medium |
Planting technique:
- Use tweezers to make small holes in the moss and soil
- Plant stem cuttings up to their first set of leaves
- Space plants according to their mature size
- Start with larger plants in the back, smaller ones in front
Video Tutorial
I’d like to give credit to Terrarium Designs for their informative video, which served as a reference for this guide.
Caring for Your Terrarium
Once your terrarium is complete, minimal care keeps it thriving:
- How often should I water? Only when the soil looks completely dry, usually every few months for closed terrariums.
- What’s the best location? Bright, indirect light, away from direct sunlight, which could overheat the container.
- When should I open the lid? Every 1-2 weeks for fresh air exchange and health checks.
- How do I control plant growth? Trim overgrown plants with small scissors to maintain size and shape.
- What if condensation blocks my view? Remove the lid for a few hours to reduce internal moisture levels.
DIY Terrarium Problems: Quick Fixes That Work
Even the most carefully constructed terrariums can encounter issues. Here are the most common problems and their simple solutions:
| Problem | Cause | Solution |
|---|---|---|
| Constant condensation | Too much moisture | Remove the lid for several hours |
| Mold on the soil surface | Overwatering + poor air flow | Reduce watering, improve ventilation |
| Plants turning yellow/brown | Wrong moisture levels | Adjust watering schedule |
| Plants growing too large | Natural growth | Trim regularly or transplant |
| No plant growth | Insufficient light | Move to a brighter location |
| Bad odor from the terrarium | Stagnant water or decay | Add activated charcoal, improve drainage |
Making It Your Own
The beauty of DIY terrariums lies in personalization. Use colored sand for visual interest, incorporate meaningful objects from special places, or create seasonal themes with temporary decorations.
Start simple with readily available materials, then experiment with unique containers and plant combinations as your confidence grows.
Final Thoughts
Building your first terrarium opens the door to a rewarding hobby that brings nature indoors with minimal effort.
These self-contained ecosystems teach patience while providing year-round beauty and a sense of accomplishment.
The process of creating something living with your own hands is deeply satisfying, and watching your miniature world thrive creates a special connection to nature.
Begin with the basic techniques outlined here, and then let your creativity guide you in future projects.
Remember that even experienced builders learn from each terrarium they create, so don’t be discouraged if your first attempt isn’t perfect.
What type of terrarium appeals to you most, or do you have specific questions about starting your first DIY terrarium project?